Weshoot.com

The Official We Shoot Blog

  • Home
  • About
  • To Comment

Archive for the ‘Tips’ Category

There’s an app for that: QR codes

Tuesday, March 29th, 2011

* * * * * * * * * * * * * * *

A little while back I noticed that there were these little mottled squares popping up all over the place, and didn’t know what they were. Some digging on the ‘net turned up that most of them are called “QR” codes (for Quick Response). I found out that Smart Phones can download an app (application) that allows the phone to read different bar codes, including QR codes. But what is in a QR code, and why would anyone want to read it? I found that you can put information into a QR code, like an instant link to a website, where the smart phone owner can point the phone’s camera at the code, and get the website up on their phone. Other info can be put into a code, like a phone number, and when read by the phone, will ask if that phone number should be put in the contact list. But I also found that the more info you put into the code, the more complex and sometimes bigger the code becomes. Since I believe that smaller mobile devices will be the communications of choice with our clientele, I have instituted QR codes on our website. If captured from a PC, it will allow those on the go to put our site on their smart phones and they can browse our site while standing in line somewhere during their busy day. I also have a code with our phone number on it, should they decide to reach us that way. I plan to institute these codes on our business cards so that no one with a smart phone has to manually input any of our info. Just another rather efficient way to connect.

I found a free application to make QR codes at http://mobilecodes.nokia.com/scan.htm

– Gary Silverstein

Tags: code, communication, efficiency, efficient, qr, qr code, quick response, there's an app for that
Posted in How To, Marketing, Tips | Comments Off on There’s an app for that: QR codes

“If It Bleeds, It Leads”

Thursday, March 17th, 2011

As Benjamin Franklin purportedly said, “believe none of what you hear and half of what you see,” and as my father added: “and 10% of what you read.” A bit cynical, perhaps, but, then again, is it? These wise men’s quotes remind me of a Spencer Tracy/Katharine Hepburn movie, where Tracy, as a newspaper editor, says, and I’m loosely paraphrasing here, “Bring me a tear jerker of a story, something to grab our readers.” This exemplification of the media staple, “if it bleeds, it leads,” leads me to a topic I believe shouldn’t go unaddressed. The news of the day leans too much on the old media axiom, “Sensationalism Sells.” What can we really believe?

But enough quotes. Let me give you some of my ideas – quote me if you like! Because so much of the media stories in respect to the economy are an attack on our psyche, we sometime s react as we would to any stab to the heart and go where it is trying to lead us. Down. Closely evaluating what we hear and read for its accuracy (and, more importantly, for the whole story) is crucial. If we are so easily influenced by all that we hear and read, shouldn’t we more thoroughly think it through before we react to it? As with all we see and hear about the economy, another couple quotes come to mind. “Take it with a grain of salt,” and “there are no absolutes.” We need to be positive about our work in respect to this economy. Through all we read and hear, good things can happen and will happen.

Lately we hear a lot about how the economy is turning around, but at a slow pace, and since my tendency in hearing this is to be optimistic, especially since I’ve always reacted cynically to the negativity, I go around spouting the “think positive” mantra. Just uttering the words, “if you think positively, positive results follow,” makes us all feel better, right? But I believe it’s more than just a cliché. Words intended to make us feel good can actually make us feel good, so why not lead with that attitude in all we do? As my mother-in-law would say, “it can’t hurt!”

Sure, many of us have been out there in the business world trying to drum up business, to no avail. We’ve expressed our interest in working with someone in a positive way. We’ve put on a smile and a suit and a snap to our walk. And the result? “We’ve got nothing now, but don’t dismay. When the economy turns around, we’ll be in touch.” Well, the economy is turning around. There’s reason for optimism. We will succeed.

And we will. The next time you hear something negative about the economy, remember it’s never the whole story. And the biggest part of the story is you. How you make it happen. How you turn things around. The steps you take. But then again, what do I know? This sounds an awful lot like something I read.

– Dione Benson
3.17.11

Tags: economy, information, media, misinformation, overreacting, quotes, reportage, the whole story
Posted in Tips | Comments Off on “If It Bleeds, It Leads”

Color and Calibration . . .

Tuesday, October 5th, 2010

As any good digital photographer knows, the color and brightness varies from monitor to monitor.  That is why it is very important for a pro photographer  to have a professional-style monitor to go along with all that other special and expensive equipment, along with a method of color calibration that is not subjective.

Some would argue most monitors are great these days.  Even inexpensive ones.  The truth is that most low-cost monitors have too bright a back light and cannot be accurately corrected.  A light pink, light yellow, or even light green color will be blown out in a print. I don’t think you would want green concrete in your final image of your new building (unless the concrete really is green).

There are different technologies at work in different types of LCD flat-screen monitors.  Some are better suited to gaming and can be low-cost.  Some are better suited to image editing, and tend to be expensive.  At We Shoot, we go for the latter type.  We want to do our best at getting accurate color and density for printing, and for online images for our clients.  We create architectural, industrial, product, food, and engineering photography for a diverse group of business entities.  Printers have told our clients that they are happy with our work because it makes their work easier.

We are currently employing a software- and hardware-based solution to color correction on a regular basis.  Our system reminds us of when our display should be corrected to keep our system at tip-top readiness.  Our display is color-matched to the sensor system and w as purchased as a matched set.

We feel that our clients are the most important people in the world, and they deserve nothing less than the best. We show it in our photographs, and our dedication to excellence.

-Gary Silverstein

Tags: calibration, calibrator, color, display, displayed, flat-screen, icc, lcd, monitor, profile, sensor
Posted in Tips | Comments Off on Color and Calibration . . .

Saving and backing up images . . .

Thursday, September 9th, 2010

A file saved on a computer isn’t a secure file, unless it exists in at least two different places.  If it exists on two different hard drives, or a hard drive and a DVD- or CD-Rom or more drives or disks, then it has a greater chance of being secure.

Years ago, I would copy my image files from the camera’s memory card to my C: drive and work on them and save them back to the C: drive and when completed to a CD-Rom disk.  I had a CD go bad on me once, with the only copies of some files for our then main client on that CD.  I panicked.  Even though that job was “finished,” if the client called and wanted others on that disk or said they lost the original disk, I would have to say I lost the data.  I contacted many people, and no one could repair the disk.  The drive would not recognize the disk.  I finally located a company in the Bay Area who recovered the files on the disk and burnt them on another.

I made sure all media was good from that point on by checking every image on the disk and making sure all of them would open.  I would also keep copies on my hard drive as long as I could.  At some point, the CD and DVD+ RW had come out, and, although expensive, I was able to keep the data a little safer with more copies.

Hard drives started getting less expensive, and I bought an external 500-gigabyte USB 2.0 hard drive as a back-up drive.  I was still copying the files to DVD-ROMs when the job was finished, clearing the space on the main C: drive in my computer, but leaving it on the external back-up drive.  I at least had two copies of my files to make them more secure.  One day, I went to access a file on that back-up drive, and the screen went black.  The back-up drive ground to a halt.  It never restarted.  I didn’t lose any files as they were still on my main drive and on disk media.  I replaced the 500GB drive with another brand and it was 750GB.

About a year later, I decided USB 2.0 hard drives were relatively cheap, and it cost about the same as several hundred DVD-Rom blanks, so why not back up onto two external drives, and, when full, inventory them, disconnect them from the computer, and store them until images on them are needed.  Since I am mirroring the data on two external drives, and since one is full prior to the other, as long as I have an inventory, I can find any files I am searching for.  I no longer have to waste time burning DVDs and proofing every image on them as I already have done that on the hard drives.

My current setup is an ultrafast PC with two internal eSATA one terabyte drives, in non-raid configuration.  All images are first saved to only one of the internal drives.  One drive has all the programs and my document libraries on it with lots of room to add more.  The other internal drive has mostly images on it.  Once I work on an image on the internal drive, at the end of the session, I copy it to each of the external USB 2.0 drives.  This give me 3 copies of each file, guarding against loss.  The USB 2.0 drives are a bit slow for the huge amount of data that pours from the eSATA drive in the computer.  Once I start the copying, I can go and have a cup of coffee and when I return, the copying is usually done.  I just retired the 3/4 terabyte (750GB) drive as it had less than 10% free space left.  I don’t think it is a good idea to fill a drive completely, as drives need some free space to efficiently move the data around when reading and writing.  Since USB 3.0 is now available, I purchased a new one-terabyte drive, and also upgraded to a USB 3.0 host adapter card with two external ports and a bridge inside to allow upgrading to two faster eSATA  drives in the future.  I could have purchased a two- or three-terabyte drive instead, but I think one terabyte is inherently safer.  Drives run all the time and will wear out at some point, maybe before filling up.  I think one terabyte will probably be full before it will fail and will be a good storage medium since it will only be called upon to provide an image that is no longer available to the computer from other means.  And, in the end, I will still have at least two copies.  I am gambling a little more money buying separate smaller drives, but that is the way I deal with it.

One remark I will make is that the USB 3.0 is way faster than the USB 2.0 drive it replaced.  And I have cut the amount of work I have to do to back up my files.  I will have a little less expense when I replace the other USB 2.0 drive as I don’t h ave to buy a host adapter card for it.

If you have images or other important files you really care about, do yourself a favor.  Back those files up on separate media and/or hard drives.  You’ ll be glad you did.

For those of you who want a freeware inventory program that I found on the ‘net that seems to work well, go to the contact page on our website at http://weshoot.com, email me, and I will send you the link to the download page.  It can be used to inventory media and hard drives that later will be separated from the computer.

-Gary Silverstein

Tags: back-up, backup, copy, copying, data, file, hard drive, image, save, saving, USB
Posted in Tips | Comments Off on Saving and backing up images . . .

New Technology . . .

Monday, July 19th, 2010

A couple of months ago, a bit of new technology for editing images was announced.  Adobe Photoshop CS5 was available for purchase.  At the moment, I have CS4.  Previously, I used CS2.  I usually skip one iteration of the program to justify the expense and pain of buying and installing it.  However, the newest version has something called “content aware” that, if it works as advertised, will be a great time saver and make my life easier.

I am usually able to upgrade at an affordable price, as I spent what I considered a lot of money some years ago, buying the program at full price.  Adobe allows upgrades to go way back.  They still even allow you to upgrade from CS2 at the same low price at which I am able to buy it.  Some people look to get pirated versions of this program to get a lower price.  My advice is:  don’t do it.  Adobe has figured out how to make the real program inoperative without legacy key numbers and a new key number to unlock the program.  Buy from a reputable seller.  Amazon may be reputable, but every seller on Amazon may not be.

No matter how much technology costs, we all have to deal with it to get the job done.  I felt the one new feature was worth the money it cost to upgrade, as well as it having several other attributes.

One complaint by professionals on a retouching forum on the ‘net is basically, “There goes the neighborhood,” about the relative ease the new program adds to retouching, allowing amateurs to retouch with aplomb.  Don’t be too dismayed.  There still is a barrier to entry.  The cost for the full program at Adobe is close to $700.00 USD.  Even if somebody can afford to buy the program, it doesn’t make them a Photoshop expert and know how to get the most out of it.  Many who have it don’t know how to really use it.  However, these people tend to give the work away, and it affects the price true pros can charge for their work.

Frequently, I am told, “I need it yesterday.”  Clients seem to wait until the last possible minute before contacting a photographer.   I therefore want to make it so I can turn the work out faster and easier to meet that challenge.

So, if you want to call yourself a professional, you have to buy into it.  It may mean doing without something else in order to stay current.  Less lattes can mean more Photoshop or more computer memory.  I am not talking about some secret weapon that will let you get a jump on the competition, but to stay even.  It may be fun, but more often, it is a business decision needed to get the work out. 

-Gary Silverstein

Tags: competition, competitive, cs4, cs5, current, edit, forum, Photoshop, retouch
Posted in Tips | Comments Off on New Technology . . .

Getting the mountain to come out!

Thursday, June 17th, 2010

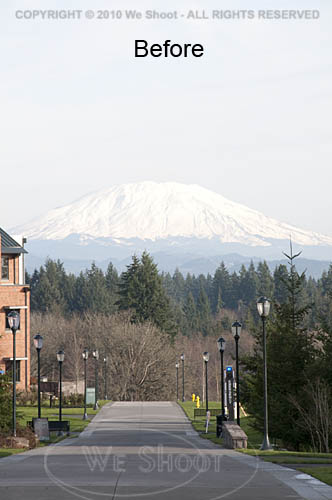
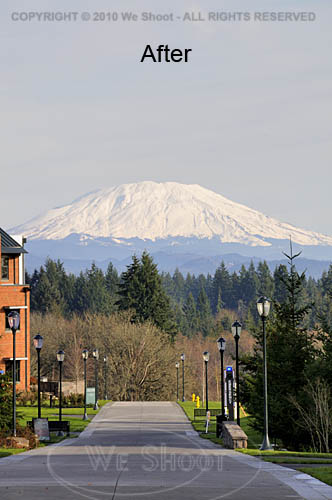
I work and live in the great Pacific Northwest.  The area from Seattle through Tacoma and Olympia, Washington to Portland, Oregon is generally where you will find me.  The features that stand out around here are views with a mountain in them.  Whether it is Mt. Rainier, Mt. Saint Helens, Mt. Adams, Mt. Baker, or another of those monoliths that dominate the scenery, sometimes they are far enough away to get aerial haze clouding the images.  Consequently, if the image is light enough for great detail in the foreground of the image, the mountain will appear so light as to almost disappear from the image.  Here are some ways to fix this: all involve the use of editing software of some kind, but the results can be worth it.  See the two samples below.


There are many ways to get this to come out in one image.  If you are using raw software, you can make two different tiff images from the same raw file.  Manipulate one tiff so that the foreground comes out with the proper density and color, and edit the other version to be much darker, with more contrast and saturation.  Name them differently so you can bring them both up in your editing software.  Copy the lighter image to the darker one as a layer.  You can use the following editing program operations to edit the image.

I prefer the following method over the one outlined above, mainly because it allows retouching of the image as one image, rather than dealing with layering two different unretouched images.  First, open your image in your editing program – the one I currently use is Adobe Photoshop CS4.  Next, retouch and enhance the image as necessary.  Next, make a duplicate layer.  Save the newly-layered file as a separate psd file.  Click the eyeball symbol next to the upper layer to make it invisible, and move to the lower layer to work on it.  There are several ways to darken the bottom layer.  I prefer using adjustment layers like curves, levels, saturation, etc., to get this done.  Once the mountain looks sufficiently dense enough to appear stronger in the image, I click on the eyeball spot again to again make the upper layer visible.  I then create a mask for the upper image.  I sometimes take the pen tool and trace out the mountain to select it by itself, making a path that will become a selection, but in any event, I use a black brush to paint out part of the upper layer and allow the lower layer to show through to some degree, or even 100%.  If I think it needs more tweaking, I sometimes make a “soft light” layer above all the rest of the layers and darken appropriate areas.  Once I am satisfied, I flatten the layers and resave it in a “retouched” folder with the same number.  As you can see by the images above, it makes the mountain stand out, and it looks better than what the camera recorded to begin with.

– Gary Silverstein

Tags: enhance, enhancement, haze, mountain, pacific northwest, retouch, view, Washington
Posted in Tips | Comments Off on Getting the mountain to come out!

Are your images noisy?

Wednesday, June 16th, 2010

Digital images have a problem not seen in film.  Digital images can have “noise.”  For a definition of noise, I will refer you to Wikipedia at: http://en.wikipedia.org/wiki/Image_noise .  Someone on the ‘net said that noise in digital images was like grain in film.   I don’t think so.  While grain in film was largely ISO or ASA dependent – lower grain at numerically lower ISO (ASA) numbers – noise seems to come from factors such as underexposure, quality of the sensor, how many megapixels are jammed onto the sensor, etc.  Grain happened all over the image, while noise seems to come up in areas of a digital image that are underexposed.  In my experience noise can take two forms: color and luminance.  Luminance is a somewhat grainy appearance and usually makes shadows appear to have dark mottled areas.  Color noise is grainy, mottled, and sometimes adds colors like yellow and green to the mix.  Even relatively good cameras at low ISO numbers can have some noise in the shadow areas, especially when trying to lighten them up.  Some of the ways to deal with noise are: get a low-noise camera; overexpose a little; shoot raw images, which have more latitude for correction than jpegs; use noiseware software; darken shadow areas so the noise is blended; blur the shadow noise so it is not mottled; color or clone in noisy areas.

Noiseware, such as that made by Imagenomic, or Noise Ninja, etc., use algorithms to alleviate noise.  But be warned, the heavier you use such software, the softer the image will look in the areas covered by the software.  In other words, if you use the software on the entire image, it may appear soft or blurred.  One can use editing software to section off areas of an image and only use the software on those areas.  I do it a different way.

I open the image in Photoshop and create a duplicate layer of the image.  I go to the bottom layer and use my noiseware plugin filter to smooth the noise on the entire layer.  I move up to the upper layer, and create a mask on that layer.  While in that mask, I simply use black to paint out the areas in the upper layer and let the lower noisewared layer show through.  This gets rid of the noise only where I want, and does not blur the rest of the image, which still is absolutely sharp.

Some clients do not mind noise, while others, notably the stock agencies, abhor noise and will fail an image for noise, or Soft Or Lacking Definition (SOLD) images as quick as you would blink.  Try to eliminate noise in your photos for a better look, and better images.

– Gary Silverstein

Tags: artifact, correct, correction, digital noise, layer, mask, masking, noise, Photoshop
Posted in Tips | 1 Comment »

We Shoot Blog Kickoff – about black and white photographs

Monday, June 14th, 2010

Color image    Black and white image

Today, very few people are using film to create their images, and commercial photographers were early adopters of digital photographic equipment.  I was one of the early ones.  So, I was faced with the question: How does one make a black and white image with a digital camera?  I can’t speak for all cameras, of course, as there are so many different ones.  Some cameras have a facility built in to take a b/w photograph.  We have an older point and shoot camera that doesn’t seem to have that capability.  It also shoots only jpegs.

Our DSLRs, or digital single lens reflex cameras, on the other hand, are able to shoot in a b/w mode.  Here are some caveats.  When shooting a jpeg image in b/w mode, the effect is permanent – I am unable to find a way to reverse the format once the image has been taken and it is black and white, should I desire the image in color.  We have Nikon DSLRs (this is our choice, and not an indictment of other brands), and they are also capable of shooting a “Raw Image.”  Raw is usually a non-destructive format, meaning that changes to the image can be deleted and the image returned to the state in which it was taken.  Raw is usually the choice of professionals, as there is more digital information left intact in the image, like color and density, than there is in a tiff or jpeg.  Raw images can be manipulated by computer software a lot more than the aforementioned tiff or jpeg, and a raw image can be converted to other formats after manipulation.  Here’s where there is an advantage to shooting raw:  even if the camera is in b/w mode, I can again get a color image from the raw format.  It seems the b/w mode is a filter in the camera, and if using the Nikon Capture NX2 software, it shows the image as a black and white, but the filter can be removed by the software.  Other software, like Photoshop CS4 doesn’t even see the black and white filter, and shows the raw image as one with the original color!  If taking a jpeg image with the same camera, the b/w effect is permanent!

We have a client, an advertising firm,  who wants all the image samples we show them and the images they order in black and white, gray-scale.  This is a lot of work, but it has its rewards.  We have gotten great expertise in doing this, and we have a lot of images that can later be used in color or black and white for other things, as well as stock.  These images are non-proprietary, meaning they aren’t of the client’s product, property, or personnel.  They are images from the world around us, and are used in an editorial way

So, what is our workflow for this client?  First, we shoot the images with a high-resolution digital camera, in color.  Then we process them in the Nikon raw editor, Capture NX2.  We tweak the color and density in this program and convert them to color tiffs.  Next, we open the tiffs in Photoshop CS4 where we further process them, removing flaws, lightening and darkening specific areas on the image.  Now, there are several ways to make a black and white image from color.  We prefer using the black and white adjustment layers in CS4.  It gives us a lot of ways to manipulate the image for contrast, density, and even filters the image like it was shot with a filter on the camera lens.  Want a dark or black sky with white clouds?  There are filters for that! (There’s an app for that!:-) ).  After getting what I want in the look of the image, I convert the image to a gray-scale tiff.  After I am done with the multitude of images I have created in this manner, I use Photoshop to batch the images to low-resolution jpegs, and put our copyright and/or logo on the sample images. This keeps unlicensed use from happening.

Next, I make a zip file out of all the sample images, and send them on to our client over the Internet, so they can choose which of the images they would like for their purposes.  Once they let me know what they want, I can either put them in a zip file and send it to them over the ‘net, or burn them to a DVD and send them via carrier.

That is just how we deal with one client.  Black and white photographs are abstract, different, and fun.  They are also a lot of satisfying work.

– Gary Silverstein

Tags: b/w, black and white, commercial, photographer, photography, professional
Posted in Tips | Comments Off on We Shoot Blog Kickoff – about black and white photographs

Next >>

  • Categories

    • How To (21)
    • Information (548)
    • Learning (30)
    • Lighting (179)
    • Marketing (291)
    • Photographs, Images (545)
    • Tips (38)
    • Uncategorized (2)
    • video (13)
  • Archives

    • September 2025
    • June 2025
    • May 2025
    • April 2025
    • January 2025
    • December 2024
    • November 2024
    • September 2024
    • August 2024
    • July 2024
    • June 2024
    • May 2024
    • April 2024
    • March 2024
    • February 2024
    • December 2023
    • November 2023
    • October 2023
    • September 2023
    • August 2023
    • July 2023
    • May 2023
    • February 2023
    • January 2023
    • October 2022
    • September 2022
    • August 2022
    • July 2022
    • March 2022
    • February 2022
    • January 2022
    • December 2021
    • July 2021
    • June 2021
    • May 2021
    • April 2021
    • March 2021
    • February 2021
    • January 2021
    • December 2020
    • November 2020
    • October 2020
    • September 2020
    • August 2020
    • July 2020
    • June 2020
    • May 2020
    • April 2020
    • March 2020
    • February 2020
    • January 2020
    • December 2019
    • November 2019
    • October 2019
    • September 2019
    • August 2019
    • July 2019
    • June 2019
    • May 2019
    • April 2019
    • March 2019
    • February 2019
    • January 2019
    • December 2018
    • November 2018
    • October 2018
    • September 2018
    • August 2018
    • July 2018
    • June 2018
    • May 2018
    • April 2018
    • March 2018
    • February 2018
    • January 2018
    • December 2017
    • November 2017
    • October 2017
    • September 2017
    • August 2017
    • July 2017
    • June 2017
    • May 2017
    • April 2017
    • March 2017
    • February 2017
    • January 2017
    • December 2016
    • November 2016
    • October 2016
    • September 2016
    • August 2016
    • July 2016
    • June 2016
    • May 2016
    • April 2016
    • March 2016
    • February 2016
    • January 2016
    • December 2015
    • November 2015
    • October 2015
    • September 2015
    • August 2015
    • July 2015
    • June 2015
    • May 2015
    • July 2014
    • June 2014
    • May 2014
    • September 2013
    • June 2013
    • March 2013
    • February 2013
    • January 2013
    • December 2012
    • October 2012
    • July 2012
    • June 2012
    • May 2012
    • March 2012
    • February 2012
    • December 2011
    • September 2011
    • August 2011
    • July 2011
    • March 2011
    • December 2010
    • October 2010
    • September 2010
    • July 2010
    • June 2010
  • Meta

    • Log in
    • Entries RSS
    • Comments RSS
    • WordPress.org

Copyright © 2025 - weshoot.com | Entries (RSS) | Comments (RSS)

WordPress theme designed by web design