Weshoot.com

The Official We Shoot Blog

  • Home
  • About
  • To Comment

Posts Tagged ‘shooting’

We Shoot Photography Of The Day For 10/16/2018

Tuesday, October 16th, 2018

Click on image to enlarge.  Click again to enlarge to full size. 

Click on back button to return to post.

Click the “Home” tab above to see earlier posts.

Seattle Product Photography by We Shoot


Seattle Commercial Photography by We Shoot

Macro image of a black powder primer capper and percussion caps for black powder guns. Seattle Commercial Photography by We Shoot.  This image is available in high-resolution for licensing without the copyright notice and watermark at Alamy at http://bit.ly/2Ejkq4p  .

Tags: black powder, cap, capper, caps, firearm, firearms, gun, guns, mercury fulminate, percussion, primer, primers, shoot, shooting, shot, weapon, weapons
Posted in Information, Lighting, Marketing, Photographs, Images | Comments Off on We Shoot Photography Of The Day For 10/16/2018

Everybody’s a food photographer . . . NOT!

Thursday, July 10th, 2014

Like a lot of other people, I go to Facebook, Flickr, Twitter, and other social sites, and I see lots of images of food.  Contacts and colleagues, as well as anonymous strangers, have decided to show what they are about to eat, or have partially eaten.  The explosion of cell phone cameras and other low-cost digital cameras has allowed many people to think of themselves as “Food Photographers.” Anyone today with a heartbeat can take a picture.  I look at some of the food photography online, and there are comments from others on this, like:  “That looks so yummy, I wish I could have some!”  Or, “That looks delicious!”  I look at the images and it is all I can do to keep my last meal down.  What I usually see is not well composed, never styled, improperly lit, and the colors are sickly.  This is akin to those blurry, out of focus  images some people take of their kids and post on Facebook, to the delight of their friends and grandparents who say “Great shot!” The one thing they all have in common was that all the images were created for free, once you factor out the cost of the phone or camera, memory cards, readers, computers, and editing software. As I create food photography professionally, I have decided to see if I could take decent images of food with my cell phone and run it through Photoshop to get decent looking food shots. Now, real commercial food photography takes planning, a good food stylist, lots of lighting and equipment, and photographic experience.  It also takes a tremendous amount of patience.  I have dealt with clients, corporate chefs, tight spaces, and less than ideal shooting conditions.  Sometimes the food looks great but is actually inedible because things are done to it for the purpose of great photography. I went out to a favorite Mexican restaurant for dinner the other night and, as usual, I brought along my iPhone, which actually has a decent camera built-in (for what it is).  It takes 8 megapixel images in .jpg form.  It performs reasonably well in relatively low lighting conditions.  It has a strobe.  But, first, it doesn’t shoot in RAW format. This is important for making better final images.  More megapixels means more information and higher enlargement quality.  Not all megapixels are equal.  There are many cell phones that have larger pixel counts than the iPhone, but the picture quality isn’t as high, as evidenced by the fact that several stock agencies will accept still images and video from iPhones, but not other cell phones.  Image noise becomes a factor when jamming high pixel counts on small sensors. For this reason, a cell phone isn’t what a pro would use.  If you are going to shoot food, in my opinion, a 24mm X 16mm sensor in a DSLR at 10 megapixels that shoots in RAW format would be the minimum to use. So, despite my opinion, I decided to experiment as a pro since I have indeed been paid to photograph food by people in the food biz.  I decided to work with the chips and salsa. The first obstacle is lighting.  In this example, we are away from the outside windows and close to an inside wall. I am shooting hand-held.  So it has to be either the ambient room lighting or the camera flash.  Trying the flash, I get the following image: IMG_0388 Although it looks sharp as a small image, there is unacceptable camera movement evident in the full-sized version.  Harsh shadow at the top of the paper.  Loss of light away from the center, and all the color is off.  No styling is evident.  This was just the way the food was delivered.  Yet I see images on FB worse than this with someone saying “yummy” in the comments. I then try the somewhat same shot using room lighting, without the strobe.  See the sample image below: IMG_0384   
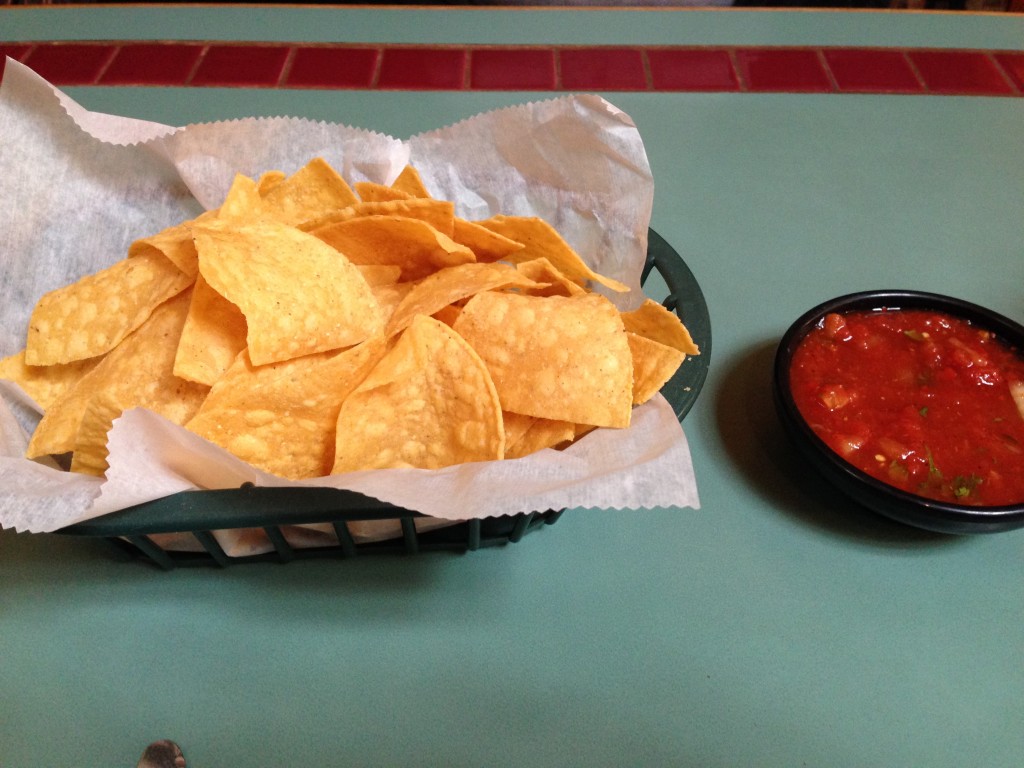
While in-focus and more appealing color is evident and lighting is more even, the shadows are still way too heavy, caused by non-diffused room lighting.  The position of the camera is dictated by my seating.  I can’t get far enough back to get the chips and salsa in the frame.  The tip of my silverware can be seen at the bottom of the image.  Remember that I am shooting as most people do who post images online, not as a pro.  There will be no styling. Next, I take the image and put it through a little Photoshop massage.  It comes out looking like this: IMG_0384 ret 
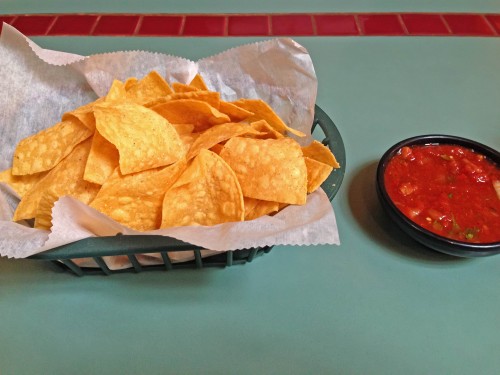
With shadows lightened, color enhanced, top of the image straightened, and the silverware tip removed, it looks better – but still nowhere near professional quality.  Maybe worthy of FB, but not for marketing. I will show you a styled, professional image we did a while back of two taco salads, chips, and the rest of the fixings: taco salads 
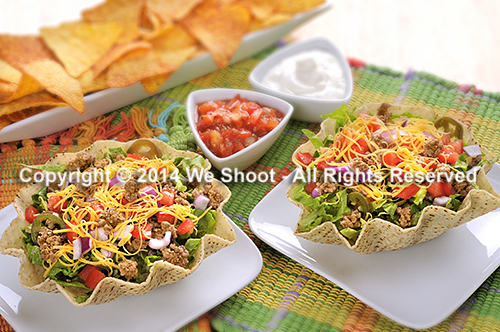
As you can see, the color is quite appealing, the image is light and colorful, and the food is crisp and fresh-looking. Shadows are attractive and unobtrusive. The image has been styled by a professional stylist, and a lot of diffused strobe light has been used.  Lighting is off-camera to give highlights where needed and provide depth.  This is professional food photography – the kind supplied by We Shoot.

– Gary Silverstein

Tags: commercial, commercial photographer, commercial photography, food, food photography, Photoshop, retouch, shoot, shooting, weshoot.com
Posted in How To, Information, Learning, Tips | Comments Off on Everybody’s a food photographer . . . NOT!

Reflecting on Reflections, Part 3

Monday, June 28th, 2010

“The Shoot From Hell,” said one of my assistants, in reference to shooting the electronic control panel housed in brushed stainless steel.  Brushed stainless is no shiny brass doorknob to shoot, see previous blog post “Reflecting on Reflections, Part 2,” but it is definitely something difficult.  The unit (see images below) is a rather large, oblong-shaped, heavy electronic control panel with three red LED read-out screens which were as reflective as a mirror, housed inside of a brushed stainless steel shell, which was also quite reflective.

The brushed stainless, unlike the doorknob, won’t show my countenance, but will show all lights, colors, and dark areas surrounding it.  Any light that is not broad, whether a room light, a window, or the reflected light off our clothing, shows up as a blurry, colored reflection blob.  The size of the unit makes it difficult to isolate easily.  Many different exposures were made to control where lights sat, where reflectors were aimed, and where the assistants and I were situated.

Each setup or position of the unit was accompanied by moving lights and camera and adjusting everything many times.  My assistant who muttered the “From Hell” phrase, is himself a good photographer who eschews lighting and strobes to create images.  He mostly likes to shoot with available light.  He said it would drive him crazy trying to photograph things like this for a living.  I, on the other hand, view it as a challenge.

Finally, when I finished shooting the product, many hours were spent retouching and enhancing the images.  I then submitted the images to my client as low-res jpegs over the ‘net, and we worked together choosing the background for the images he liked.  See the images below.

While reflective objects present a challenge, make sure your attitude toward them is not defeatist.  This is difficult shooting to say the least.  Hard work and determination is the hallmark of anyone trying to get this done.

One last word on this kind of shoot.  It does not lend itself to using a point-and-shoot camera with the flash on the camera.  For the most part, it has certain minimum requirements of a good DSLR camera, and sufficient off-camera lighting and lighting equipment.  Otherwise, the results will be unsatisfactory and amateurish.

– Gary Silverstein

click on image to enlarge

click on image to enlarge

click on image to enlarge

Tags: enhance, Photoshop, reflecting, reflections, retouch, shoot, shooting
Posted in Learning | Comments Off on Reflecting on Reflections, Part 3

Reflecting on Reflections, Part 2

Thursday, June 24th, 2010

Without a doubt, the hardest single thing I ever photographed was, of all things, something so ubiquitous that we handle them every day.  I am talking about door knobs.  Plain, highly reflective, brass doorknobs.  Now, why is it so hard to photograph a doorknob?  Well, it becomes a lot more difficult when there are some rules.  Rules like one would run into with a doorknob manufacturer looking for someone to shoot images of their products for promotions.  Do you think they want a reflected image of a happy, smiling distorted photographer looking out from their new brochure at the viewer?  How about seeing that photographer’s camera and tripod, or the space the doorknob happens to be in?  Simple, inexpensive, plain, highly polished brass doorknobs become painful to contemplate as a product photographer.  They not only are spherical and reflect the entire world around them, they have a backing plate made of the same stuff, that will reflect things that exist behind the knob, from the reflection on the back of the knob.  

Several years ago, we had spoken with a potential client, the marketing department head at a large manufacturer of doorknobs, hardware, and faucets about working for her company.  She said she had several photographers she used for shooting these products, but she said she would send us a sample of their products so that we could submit a test photograph to show that we could handle this type of photography, in case she needed our services.  Parameters for shooting this product were clear.  Shoot it on a 4″X 5″ transparency, and no retouching of any kind was permitted.  She said they did any retouching needed at the graphics department at the manufacturer.  

About 5 days later, the product arrived by UPS.  There was a plain brown cardboard box inside the outer package.  I opened it up and beheld a photographic nightmare.  It was an inexpensive, highly-polished brass doorknob set, complete with keys.  

It reflected everything!  It saw me, the room, everything in the room, and to my horror, the backing plate re-reflected everything the back of the knob “saw.”  I knew this was to be a fight.  I looked at images of doorknobs in advertising.  They looked perfect.  Some were “brushed” metal – not polished, but still shiny.  Some were dull finished, and just reflected highlights.  The polished ones stood out.  No reflections of photographers, cameras, tripods, rooms, etc.  I assumed that there was some reflection of a camera lens somewhere during the taking of the image, as there was no way to avoid the reflection from the angle presented.  A different angle may have allowed one to position the lens where the reflection would be positioned over the keyhole, but you can’t shoot there for different angles.  The first problem includes camera, tripod and photographer reflections.  One way to avoid this taking up a lot of room on the doorknob is to make a blind out of white material, like foam core, and cut a hole through which the camera lens “sees” the doorknob.  

Although this cuts down on untoward reflections, it still reflects the lens and the hole, unless the hole is dark and tight around the lens.  I figured this made for a minimum of retouching at the graphics department, and would be acceptable.  A second consideration was the lighting.  Lights or hot spots show up on the product itself and a smooth highlight with no hot spots would be a better solution.  Everything I tried did not work!  As said before, putting a piece of foam core in front of the doorknob cut down reflections, but I thought that aiming lights from behind the doorknob and bouncing the light toward the white foam core blind would produce the effect without bad reflections.  I was wrong.  The strobe “soft boxes” reflected into the back side of the door knob and re-reflected off the backing plate.  I had distorted oblong light reflections staring at me from the backing plate.  

It became evident there must be a way to do this.  I tried white sheets, but the lights created hot spots, and it reflected any corners and folds.  I had seen a shooting tent at my local pro camera store, and headed down there next.  A tent like this was used to evenly light small products and I thought this was the ticket.  It cost $250.00 plus tax.  I got the tent home, and assembled it.  It was made of a translucent white fabric, meant to diffuse the light inside.  It also was rigid and had seams and a rigid frame inside the fabric which showed up in the reflections.  It had several holes for camera placement, and try as I might with stuff to cover them, they showed up, too.  Fortunately, I was able to return the tent for a refund as it really didn’t do the job.  

I even talked to man who owned a company that made plastic blister packs in Santa Barbara.  I drove out to Santa Barbara to get a prototype dome of a transparent, but clouded plastic that he was thinking of producing.  It took out most of the distracting reflections, but reflected the cloudy nature of the dome and made the doorknob appear dull and not highly reflective.  I sent it back to Santa Barbara with a thank you note and a description of the effect.  

I finally built a box enclosure of translucent white plastic, got what I thought was a good image and sent that to the marketing manager.  She said to keep the doorknob, and she would call us if she needed us.  Last I heard, she was working for another company doing something completely different.  She never called!   

Below is the image I created, after scanning it and retouching it for our portfolio.  Shiny, reflective doorknobs are tough.  Try it if you doubt me.  

– Gary Silverstein      

Doorknob with minimal reflections - click on image to enlarge

Tags: 4x5, camera, photography, Photoshop, reflecting, reflections, retouch, shoot, shooting, view, view camera
Posted in Learning | 10 Comments »

Reflecting on Reflections, Part 1

Saturday, June 19th, 2010

I was once asked about the hardest thing I ever photographed.  Of course there have been several difficult things to shoot, but as a commercial photographer, some product and catalog shoots and reflective objects just jump out.  Reflecting on a number I have done, I think they have gotten a bit easier for me with time, either because of experience, or the ability to use digital retouching and enhancement techniques, or both.  To say that there are no more challenges would be a misstatement, however.

My first bout with reflective product shots came during the era of film, long before digital capture or scanning was even possible.  Digital retouching was a pipe dream for the future.  I was asked to photograph jewelry with a large-format view camera (a 4X5) on transparencies.  We opted to use our then-considered-powerful 1200 watt-second Balcar studio strobe set for lighting.

The jewelry pieces were white metal (silver, I think) and included rings, earrings, and a necklace.  All pieces were to be shot in one image, laid out on a blue fabric.  I was to capture highlights from the reflecting white umbrellas mounted on the strobes in each piece of jewelry in the layout.

In those days, we were located just south of Hollywood, California, and there were many film labs nearby, so film processing turnover was fairly fast – three hours on a non-rush basis.  We had 4X5 Polaroid self- processing black and white positives that could be shot with the 4X5 camera that we could see as proofs prior to shooting the transparencies which needed processing at a lab.

The Polaroids were over a dollar each, in those days – a big, but necessary expense.  For this shoot, we went through something like ten of them, just trying to position the irregularly-shaped jewelry, so it would show certain highlights.  Each time we shot one, we would find one piece that would go dark, with no highlight.  It would have no sparkle, it would look, well . . .  black!  We finally got what looked like a good Polaroid, put in the transparency film holders and shot four transparencies of the same shot (one for us, one for the client, and two for insurance in case we needed to lighten or darken the exposure by chemical process).  We ran it to the lab up the road, and three hours later went over there to see our new transparencies.  One of the pieces of jewelry had moved slightly and it went dark.  There went a bunch of money, and a lot of time.  It took until the next day before we got it right.  It was a good experience, and I learned a lot.  I managed to find the image in our archives.  See it below.

– Gary Silverstein

Tags: 4x5, camera, film, jewelry, large format, layout, reflect, reflecting, reflections, shoot, shooting, view camera
Posted in Learning | Comments Off on Reflecting on Reflections, Part 1

  • Categories

    • How To (20)
    • Information (546)
    • Learning (30)
    • Lighting (179)
    • Marketing (290)
    • Photographs, Images (543)
    • Tips (38)
    • Uncategorized (2)
    • video (13)
  • Archives

    • May 2025
    • April 2025
    • January 2025
    • December 2024
    • November 2024
    • September 2024
    • August 2024
    • July 2024
    • June 2024
    • May 2024
    • April 2024
    • March 2024
    • February 2024
    • December 2023
    • November 2023
    • October 2023
    • September 2023
    • August 2023
    • July 2023
    • May 2023
    • February 2023
    • January 2023
    • October 2022
    • September 2022
    • August 2022
    • July 2022
    • March 2022
    • February 2022
    • January 2022
    • December 2021
    • July 2021
    • June 2021
    • May 2021
    • April 2021
    • March 2021
    • February 2021
    • January 2021
    • December 2020
    • November 2020
    • October 2020
    • September 2020
    • August 2020
    • July 2020
    • June 2020
    • May 2020
    • April 2020
    • March 2020
    • February 2020
    • January 2020
    • December 2019
    • November 2019
    • October 2019
    • September 2019
    • August 2019
    • July 2019
    • June 2019
    • May 2019
    • April 2019
    • March 2019
    • February 2019
    • January 2019
    • December 2018
    • November 2018
    • October 2018
    • September 2018
    • August 2018
    • July 2018
    • June 2018
    • May 2018
    • April 2018
    • March 2018
    • February 2018
    • January 2018
    • December 2017
    • November 2017
    • October 2017
    • September 2017
    • August 2017
    • July 2017
    • June 2017
    • May 2017
    • April 2017
    • March 2017
    • February 2017
    • January 2017
    • December 2016
    • November 2016
    • October 2016
    • September 2016
    • August 2016
    • July 2016
    • June 2016
    • May 2016
    • April 2016
    • March 2016
    • February 2016
    • January 2016
    • December 2015
    • November 2015
    • October 2015
    • September 2015
    • August 2015
    • July 2015
    • June 2015
    • May 2015
    • July 2014
    • June 2014
    • May 2014
    • September 2013
    • June 2013
    • March 2013
    • February 2013
    • January 2013
    • December 2012
    • October 2012
    • July 2012
    • June 2012
    • May 2012
    • March 2012
    • February 2012
    • December 2011
    • September 2011
    • August 2011
    • July 2011
    • March 2011
    • December 2010
    • October 2010
    • September 2010
    • July 2010
    • June 2010
  • Meta

    • Log in
    • Entries RSS
    • Comments RSS
    • WordPress.org

Copyright © 2025 - weshoot.com | Entries (RSS) | Comments (RSS)

WordPress theme designed by web design