We Shoot Photograph Of The Day For 5/11/2015
Monday, May 11th, 2015
Click on image to enlarge.
Click on back button to return to post.
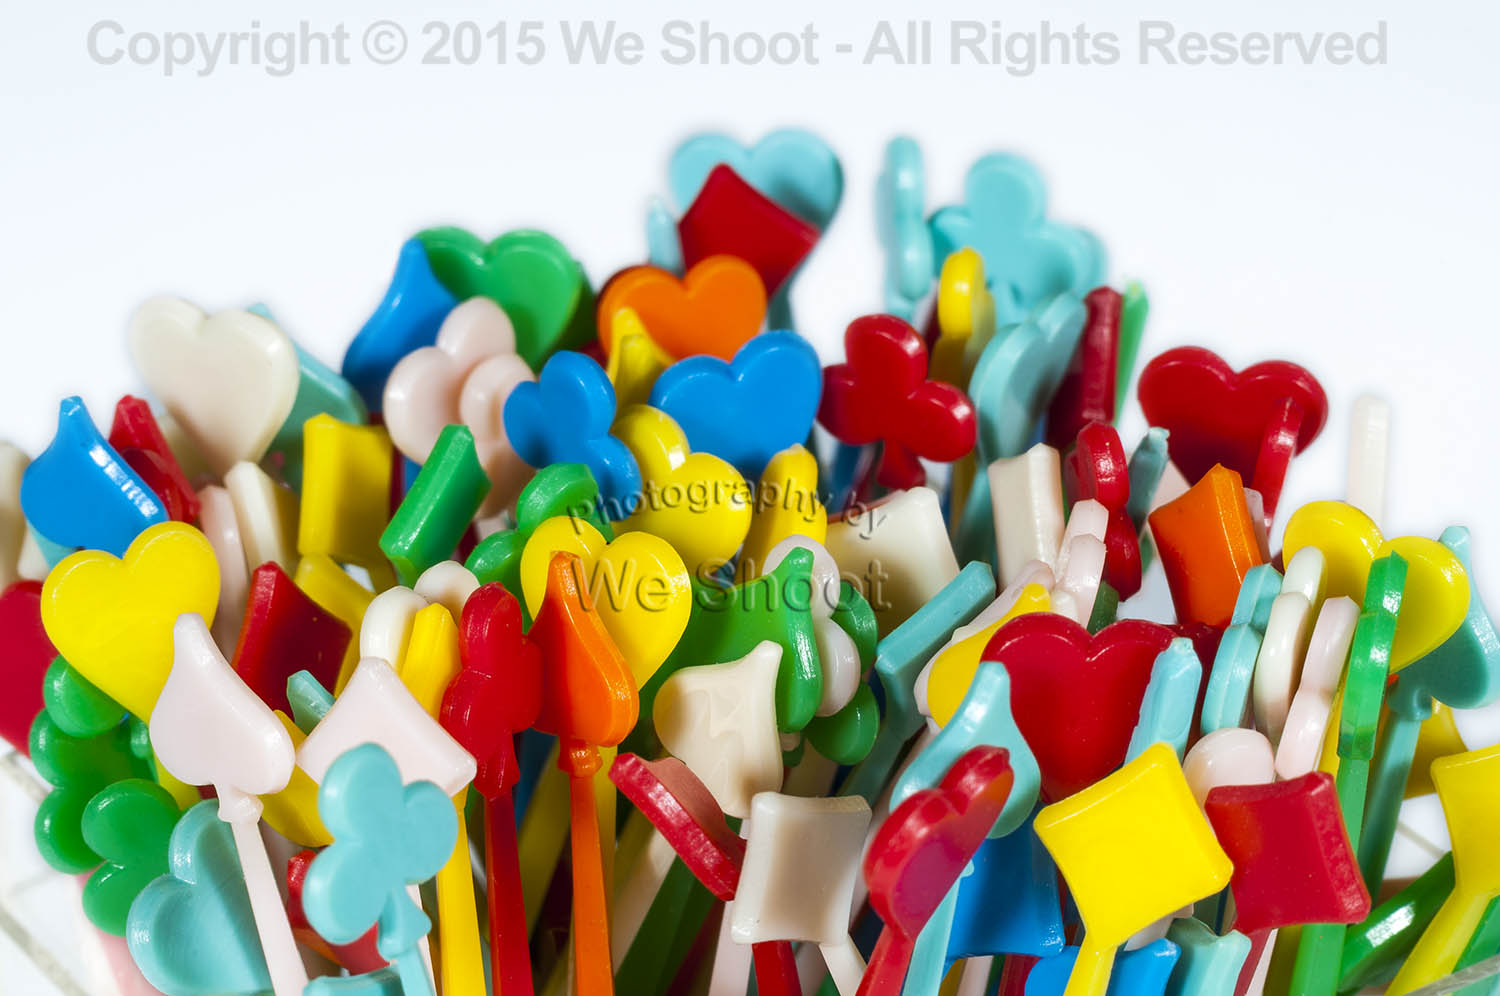
Macro product photography of the tops of decorative plastic toothpicks in a card game motif from We Shoot.
The Official We Shoot Blog
Monday, May 18th, 2015
Click on image to enlarge.
Click on back button to return to post.
Click the “Home” tab above to see earlier posts.
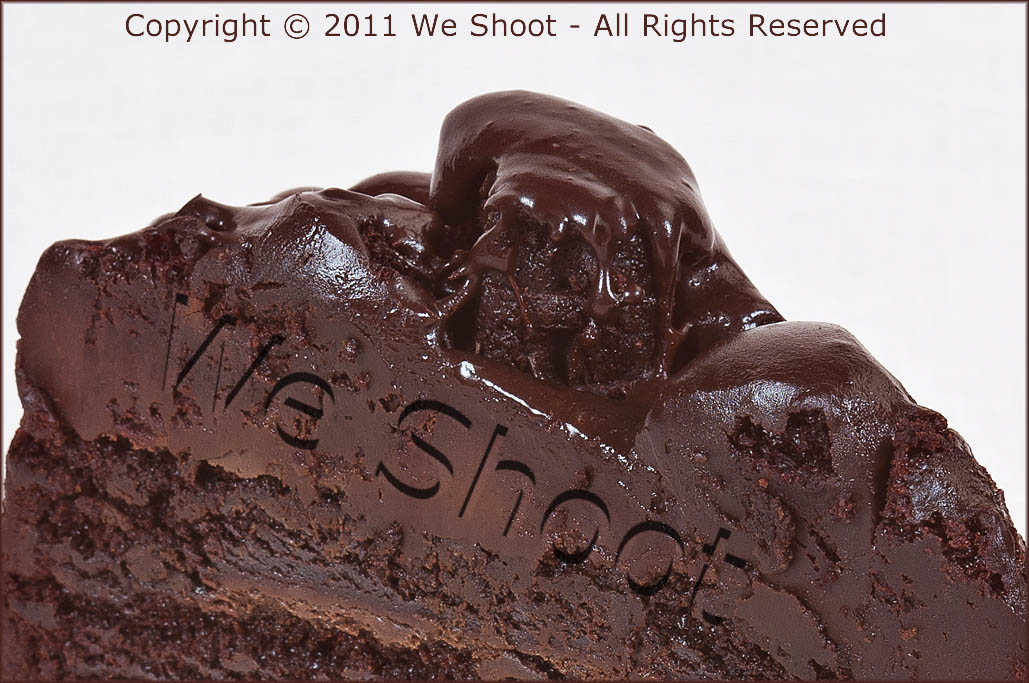
Chocolate icing on a chocolate cake by Seattle Food Photographer, We Shoot
Monday, May 11th, 2015
Click on image to enlarge.
Click on back button to return to post.
Macro product photography of the tops of decorative plastic toothpicks in a card game motif from We Shoot.
Thursday, July 10th, 2014
Like a lot of other people, I go to Facebook, Flickr, Twitter, and other social sites, and I see lots of images of food. Contacts and colleagues, as well as anonymous strangers, have decided to show what they are about to eat, or have partially eaten. The explosion of cell phone cameras and other low-cost digital cameras has allowed many people to think of themselves as “Food Photographers.” Anyone today with a heartbeat can take a picture. I look at some of the food photography online, and there are comments from others on this, like: “That looks so yummy, I wish I could have some!” Or, “That looks delicious!” I look at the images and it is all I can do to keep my last meal down. What I usually see is not well composed, never styled, improperly lit, and the colors are sickly. This is akin to those blurry, out of focus images some people take of their kids and post on Facebook, to the delight of their friends and grandparents who say “Great shot!” The one thing they all have in common was that all the images were created for free, once you factor out the cost of the phone or camera, memory cards, readers, computers, and editing software. As I create food photography professionally, I have decided to see if I could take decent images of food with my cell phone and run it through Photoshop to get decent looking food shots. Now, real commercial food photography takes planning, a good food stylist, lots of lighting and equipment, and photographic experience. It also takes a tremendous amount of patience. I have dealt with clients, corporate chefs, tight spaces, and less than ideal shooting conditions. Sometimes the food looks great but is actually inedible because things are done to it for the purpose of great photography. I went out to a favorite Mexican restaurant for dinner the other night and, as usual, I brought along my iPhone, which actually has a decent camera built-in (for what it is). It takes 8 megapixel images in .jpg form. It performs reasonably well in relatively low lighting conditions. It has a strobe. But, first, it doesn’t shoot in RAW format. This is important for making better final images. More megapixels means more information and higher enlargement quality. Not all megapixels are equal. There are many cell phones that have larger pixel counts than the iPhone, but the picture quality isn’t as high, as evidenced by the fact that several stock agencies will accept still images and video from iPhones, but not other cell phones. Image noise becomes a factor when jamming high pixel counts on small sensors. For this reason, a cell phone isn’t what a pro would use. If you are going to shoot food, in my opinion, a 24mm X 16mm sensor in a DSLR at 10 megapixels that shoots in RAW format would be the minimum to use. So, despite my opinion, I decided to experiment as a pro since I have indeed been paid to photograph food by people in the food biz. I decided to work with the chips and salsa. The first obstacle is lighting. In this example, we are away from the outside windows and close to an inside wall. I am shooting hand-held. So it has to be either the ambient room lighting or the camera flash. Trying the flash, I get the following image:  Although it looks sharp as a small image, there is unacceptable camera movement evident in the full-sized version. Harsh shadow at the top of the paper. Loss of light away from the center, and all the color is off. No styling is evident. This was just the way the food was delivered. Yet I see images on FB worse than this with someone saying “yummy” in the comments. I then try the somewhat same shot using room lighting, without the strobe. See the sample image below:
  While in-focus and more appealing color is evident and lighting is more even, the shadows are still way too heavy, caused by non-diffused room lighting. The position of the camera is dictated by my seating. I can’t get far enough back to get the chips and salsa in the frame. The tip of my silverware can be seen at the bottom of the image. Remember that I am shooting as most people do who post images online, not as a pro. There will be no styling. Next, I take the image and put it through a little Photoshop massage. It comes out looking like this:
  With shadows lightened, color enhanced, top of the image straightened, and the silverware tip removed, it looks better – but still nowhere near professional quality. Maybe worthy of FB, but not for marketing. I will show you a styled, professional image we did a while back of two taco salads, chips, and the rest of the fixings:
  As you can see, the color is quite appealing, the image is light and colorful, and the food is crisp and fresh-looking. Shadows are attractive and unobtrusive. The image has been styled by a professional stylist, and a lot of diffused strobe light has been used. Lighting is off-camera to give highlights where needed and provide depth. This is professional food photography – the kind supplied by We Shoot.
– Gary Silverstein
Thursday, May 29th, 2014
Professional photographers and amateurs alike have many things in common in this digital age: our cameras put the images we take on digital media, such as Compact Flash cards, SD cards, or similar devices. Some of the different methods for extracting the information from these cards are to run a cable (usually USB) to the camera from the computer and we instruct the computer to copy, transfer, or import the images to the computer’s hard drive(s), or we take the digital media card out of the camera and place it in a reader that serves the same function. Some of us have built-in slots in our desktop computers that will accommodate various kinds of cards. My last two computers have had the slots built in.
I’m a professional photographer and videographer. For many shoots, I go on location and have several Compact Flash cards that fit in my still cameras, and the images I shoot are stored on the CF cards awaiting transfer to my computer’s multiple hard drives. Since I usually can’t reshoot the images, and there is much more security in the redundancy of having the files on different drives, I store my images on several external drives simultaneously. Hard drives do fail. There is no excuse for losing a client’s images.
The critical point, however, is that much can happen to the information on the cards during the transfer process. Pulling a card out of a camera that is turned on can corrupt the card, as can pulling a card out of a reader during a copy phase. So, I breathe easier once the images have been copied or imported to my first hard drive without a hitch. Until I have the images on more than one hard drive, however, I keep the images on the card, as well, for backup in case something bad happens.
I recently got a wakeup call, and it was just by chance. I had been using the CF card slot in my PC to copy files from the card to the computer. I didn’t have a job for a little while and I had left the images from the last shoot on the card in the camera after first copying them to several drives on my computer. I put the card back in my camera after copying it. I usually copy to my main drive first, add keywords, my copyright, etc. to the meta data, and then copy all that to a couple more external drives for security.
About a week after I had copied the images on the card I had put back into the camera, I went to reset the camera’s settings for the most likely settings for my next shoot. It showed I still had images on the card, so I hit the view button to see which images were on the card before deleting them, AND, HORRORS, THEY LOOKED BADLY PIXELATED! I looked at several of the images in the camera and most had this problem. I hit the magnify button, and they looked sharp again, but when going back to the “fit on screen” image they again looked pixelated. All I had done was to copy them to the hard drive on my computer. The images that had been copied to the hard drive were in no way affected, but the card seemed to be corrupted. That never happened before.
Luckily, I had already uploaded the finished job to the client the day before, so I knew that the images in the computer were not corrupted.
As a pro, I can’t leave anything to chance, so I had to find out whether the card was bad, the camera had a problem, or what had screwed up the images while the card was in the computer.
My first test was to shoot test images to see what was happening. Once shot, I looked at each at the back of the camera. They looked normal. I turned off the camera, popped the card, and put it in the built-in PC reader. I copied the files to a folder on my desktop, and made sure it was finished copying. I removed the card from the PC. I made a second folder on my desktop. I then used Photoshop to view the images in the first folder on my desktop. They looked OK. I put the card back in the camera and turned the viewer on, and they were corrupted! I took the card out of the camera again, and put it back in the PC and copied the same files to the second folder on my desktop. I clicked on the first image in Photoshop and a dialog box popped up saying that Photoshop could not read the image format. The card was corrupted. Period.
I had an old external USB 2.0 card reader I used to use before having built-in slots, so I dusted it off and plugged it into an open USB slot on my computer. I put the card in the camera again and formatted the card. Again I took some test images. I took the card out of the camera and put it in the external reader. It took longer than the built-in reader, but there weren’t that many images. They copied perfectly. I took the card from the reader and put it back in the camera. I turned on the viewer, and the pictures looked normal, not corrupted. I shut off the camera and again removed the card. I again copied the files to another folder on my desktop – they could be opened in Photoshop and looked normal.
I determined that the built-in reader in the PC was corrupting the images while copying. I don’t know why: was it software, or hardware? I determined that the best way around the problem was to not use the built-in slots again on this computer, but to bypass them. I had lost faith in them. However, the USB 2.0 external reader is incredibly slow. I also use my readers for HD video on SDHC cards, and it takes forever to import video files. So, I decided to buy a new USB 3.0 external reader. I found one on B&H’s website for $14.95 (with no shipping) at http://bhpho.to/SVr845 . I ordered it and tried it out with all my different media from different cameras. It seems to work well, and it is blazing fast compared with USB 2.0.
The moral of the story is: Don’t be complacent about your digital photography equipment. Don’t assume all is well without checking it out occasionally. I could have gotten a bad surprise if I hadn’t looked at my camera, and taken action. Being a pro, you’ve got to be on your toes!
– Gary Silverstein
Wednesday, January 16th, 2013
In my last post, I discussed bracketing of exposures. Today, let’s talk about bracketing with hot lights. Hot lights are a continuous lighting source and should be regarded as available light, just sometimes very intense, and very bright. A majority of hot lights are of incandescent color temperature, adding a warm or yellow tone to your image. In most modern DSLRs, there is a setting for tungsten or incandescent light which compensates for the warm tint by adding a blue or cyan tint to the image.
Instead of using the incandescent mode in the camera for white balance, I prefer taking one exposure with a gray card in the image and setting the gray reading for all the images I take in that series with my editing software. Outdoors, my cameras are very accurate, so the automatic white balance setting works just fine. Indoors with a mix of lighting, a gray card or an Expodisk is the ticket.
Now, back to bracketing with available light and hot lights. My cameras will do up to nine bracketed shots (different exposures of the same image) automatically. Some cameras only allow three images for auto bracketing. If you desire more exposures for either HDR (High Dynamic Range) images or for layering the images with these cameras, the way to facilitate that is to do it manually. As in my last article, adjust the exposure by putting the camera in aperture-priority mode, setting one aperture and changing the shutter speed to bracket various exposures. My choice is to use 2/3 of a stop difference for each of my brackets. You may like 1/3 stop, 1/2 stop, 1 stop, or ? bracketing stops instead. If doing this manually, try to get one optimum exposure, i.e. the one picked by the camera as the overall best exposure, and make the same number of exposures brighter and darker on either side of the optimum exposure. Also, if doing it manually, you will have to put the camera on full manual for exposure, then set your aperture where you want and vary the time for the brackets.
The reason for bracketing is that the latitude for digital images is about 5 stops with detail and no digital “noise.” When lightening darker areas in a digital image, one sometimes runs into noise, either color noise which looks likes flecks of red, green, and/or yellow in that area, or luma noise, which looks like flecks of black snow. Noise is usually unacceptable in commercial work and for stock images. The answer is to bracket and take images in which even shadow areas are light enough to have detail without the need to lighten them, and to blend them into the finished image, either with HDR or layering and masking in computer-editing software. Conversely, blown-out areas of one image can be recovered from a darker bracketed image, and give detail to blown-out areas.
In summary, bracketing with available lighting or with hot lights is basically the same, and white balance should be checked and adjusted should the need arise.
-Gary Silverstein
Monday, October 1st, 2012
In the days of film, a professional commercial photographer had to be very careful of the backgrounds that would be used in his/her images. Retouching was expensive. Shooting an item for use against another background from the one it was taken with could be a labor-intensive multi-step process. A spot on a high-key (pure white) background could be touched out on the negative, and a nightmare undertaking on a transparency. Today, of course, images are taken digitally and manipulated by editing programs, like Photoshop. One of our most recent shoots involved large, heavy industrial products. In film-days past, we would have probably used a seamless white background to shoot the product and spent a lot of time with product placement. The items to be photographed were round, between two and three feet in diameter, and each weighed 500 or more pounds. Five views were to be taken of each. That means that either the item would have to be moved on the background, or very carefully lifted by a hoist onto the background. We would have to be careful of marks left by the items where they rested on the paper, and some method of keeping such round items from rolling off the surface would have to be employed and kept out of sight.
So, pre-planning for the shoot is still important, even in this digital world. We opted to not use any type of manufactured background per se, but to only use white reflectors in strategic places to reflect light or add a highlight where we desired. Not using a background simplified the lighting somewhat in that a roll of paper or fabric didn’t block out the light from behind each item. We were going to photograph the items in the factory environment with the idea that we would isolate the image in Photoshop, and put it on another, more desirable background.
Lighting was done with our powerful studio strobes, and the modeling lights on the strobes gave us an idea of how the lighting would look in the finished image. We shot with soft-boxes to give a square look to our lighting in the highlights, as umbrellas just wouldn’t cut it here as these products were light-reflective. We planned to keep the camera stationary, move the lights as necessary, and rotate the product for the five different angles the customer required. Since the objects were circular, and we wanted to keep all the images the same size, we had to plan how to keep that proportionality. Think of a coin stood on edge. The widest the image would have to be is a little more than the diameter when one of the faces of the coin is toward you. When the edge of the coin is nearer to you, the size of the image could change, but we wanted to make them all the same size for the client’s ease of putting together several views of their product. Also, we had to be far enough away to assure depth of field when we were shooting the views that showed part of the object furthest away. Editing programs have great sharpening utilities, but a severely out-of-focus image cannot be brought back. You can easily blur parts of a sharp image and make it look good if needed for the effect, but the reverse isn’t the case. So all this had to be figured out in advance.
Now, let’s go on to the backgrounds for the images. Since the area or table on which the items were shot was in a fixed location, the background for each image (as produced by the camera) would have been a toolbox and other parts of the assembly plant. So we made it so that we and our client could “lift” the item off the background and put it on any other background or even a video. This is done by means of a “clipping path.” This is a very labor-intensive process. It means that I use a Photoshop tool to painstakingly trace out every edge of the product at anywhere from a 100% to a 300% enlargement. Once I have outlined every hole, edge, and cranny, I “select” the item alone and make a layer of it to put on other backgrounds. I include this clipping path with the image, so the client is able to do the same. Now, you may ask why I do so much work, as some of the editing programs have become pretty sophisticated and make an easier selection with other, faster tools. Well, the answer is this: I have used these editing tools, and sometimes there are errors in the program choosing what is part of the item and what is not. It may not be noticeable on a small jpeg on a website, but it will stick out like a sore thumb on a 30X40 enlargement at a trade show. That is what separates a pro from an amateur. Below are an original view of one of the products, and a few different backgrounds that I feel work well. Each background below was created in Photoshop, but other backgrounds could be used, as well. Remember that whichever one a client chooses, I include the clipping path so they can put it against another background if that is their need.

As you can see, the product image looks at home with any of the backgrounds. Keep this in mind as you plan your next shoot.
– Gary Silverstein
Thursday, May 17th, 2012
I received a call from a web designer the other day. He had looked at our website at http://weshoot.com and decided it was too “plain” and that it needed his touch to make it work. I responded that I am quite happy with our website, and that it does already work. It is easy to navigate, with no delays in loading. It doesn’t have much flash, so much of it is viewable on almost all mobile devices. Yeah, maybe it’s not as fancy as some other photographers’ websites, but you can view all of our sample images at your leisure without waiting for the slideshow to bring around the image you want to see. And above all, it is visible and we get calls and emails from all over the country inquiring about our photography services. Visibility matters. The best website ever made will not get many visitors if it is on page 65 of a Google search.
What makes it visible? It is called SEO or search engine optimization. You have all heard it before. If you have a business website on the web, you have undoubtedly received a multitude of emails and phone calls, all touting services that can get you to the top of the first page of Google and other search engines. It doesn’t matter to these people if you are already there. What it basically comes out to is that most people type in a three-word phrase to find what they are looking for. Something like “seattle product photography.” As you would see, we come up somewhere on page one.
It takes a lot of work to get there. I have a professional help make this a reality. I help with my knowledge of some website development and making sure to post to social sites to help boost our SEO. My SEO pro and I communicate often when changes to the website are needed and when they have been completed. Even having a blog helps SEO.
So, the bottom line is: If you need to budget for your website, go with a little less fanciness and spend instead on real SEO. Make sure you get a pro to do your SEO. If someone guarantees you that you will be at the top of page one, you’d better be in a business with no competition, because no great SEO pro will make that claim.
If you need a great SEO professional, drop me a line via our contact page on our website at http://weshoot.com.
– Gary Silverstein
Tuesday, March 6th, 2012
First, let me say that I have nothing against technology. I, as a professional photographer, use it every day. The problem with the newest and greatest technology is determining what you really need, and secure that for your business.
New cameras have come out with incredible capabilities. These include the Nikon D800 (in two forms) and the Canon 5D Mk III. The former has 36.6 megapixels, and the latter has around 22.3. Both shoot HD video.
Let’s look at what is needed. I have been a photographer for a long time. I currently shoot for various companies on assignments that include food, products, services, architecture, and lifestyle images. I cut my teeth on event and consumer photography. One thing I can tell you is that it is folly to show up with only one camera to a professional shoot, especially if reshooting it is difficult or downright impossible. Let’s take a wedding photographer, for example. Let’s say he has $3K-$3.5K to spend on a camera or cameras. Should he buy one new Nikon D800 or Canon 5D Mk III to shoot weddings, or should he buy two Nikon D300s or Canon 7Ds?
I would say he should buy 2 of either of the latter 2 cameras. First we usually buy the brand that will accept our older lenses. That usually dictates the brand. For weddings these days, how many people will be buying or making anything larger than an 8X10?
You don’t need over 12 megapixels for anything under 30X40 (and you might even be able to push it to 40X60). Most images are printed smaller, and even wind up on the web, where a sub- one-megabyte image has sufficient size. The only photographers who need such a large megapixel camera are those who produce images in excess of 30X40, or severely crop an image from the original size. An 8X10 from a D800 won’t necessarily be better-looking than one from a D300!
Let’s also look at logistics. A 12.2-megapixel D300 Nikon produces a tiff file around 35-megabytes (8-bit). A D800 is said to produce a tiff image at around 76-megabytes (8-bit). In Photoshop, professional photographers regularly make layers to enhance their images. Each layer adds multiples to the size of that file, and unless you have a pretty robust 64-bit computer system, it may create delays in workflow, or even give you dreaded “out of memory” messages.
The second argument for buying two of the same camera is that you have a backup for the first camera. The lenses are interchangeable. A wedding couple and their families don’t want to hear that your camera failed during their wedding and you didn’t get the pictures. When we did weddings during the days of film, we used to show up with no less that 3 medium-format camera bodies, 3 lenses, and multiple film inserts or backs. We also had two shooters, and this allowed broader coverage. If you are hired to shoot, and you do not deliver, you may be in breach of contract, will possibly get sued, and will definitely generate bad will. This is very bad in this modern age, what with Facebook and Yelp.
My advice is if you are considering going pro, buy affordable cameras in pairs, or even use an older camera to back up your newer one. Never turn up for a pro shoot with just one camera. It can be a recipe for disaster.
– Gary Silverstein
Copyright © 2026 - weshoot.com | Entries (RSS) | Comments (RSS)
WordPress theme designed by ![]() web design
web design