Weshoot.com

The Official We Shoot Blog

  • Home
  • About
  • To Comment

Archive for the ‘How To’ Category

Bracketing With Hot Lights And Available Light . . .

Wednesday, January 16th, 2013

In my last post, I discussed bracketing of exposures.  Today, let’s talk about bracketing with hot lights.  Hot lights are a continuous lighting source and should be regarded as available light, just sometimes very intense, and very bright.  A majority of hot lights are of incandescent color temperature, adding a warm or yellow tone to your image.  In most modern DSLRs, there is a setting for tungsten or incandescent light which compensates for the warm tint by adding a blue or cyan tint to the image.

Instead of using the incandescent mode in the camera for white balance, I prefer taking one exposure with a gray card in the image and setting the gray reading for all the images I take in that series with my editing software.  Outdoors, my cameras are very accurate, so the automatic white balance setting works just fine.  Indoors with a mix of lighting, a gray card or an Expodisk is the ticket.

Now, back to bracketing with available light and hot lights.  My cameras will do up to nine bracketed shots (different exposures of the same image) automatically.  Some cameras only allow three images for auto bracketing.  If you desire more exposures for either HDR (High Dynamic Range) images or for layering the images with these cameras, the way to facilitate that is to do it manually.  As in my last article, adjust the exposure by putting the camera in aperture-priority mode, setting one aperture and changing the shutter speed to bracket various exposures.  My choice is to use 2/3 of a stop difference for each of my brackets.  You may like 1/3 stop, 1/2 stop, 1 stop, or ? bracketing stops instead.  If doing this manually, try to get one optimum exposure, i.e. the one picked by the camera as the overall best exposure, and make the same number of exposures brighter and darker on either side of the optimum exposure.  Also, if doing it manually, you will have to put the camera on full manual for exposure, then set your aperture where you want and vary the time for the brackets.

The reason for bracketing is that the latitude for digital images is about 5 stops with detail and no digital “noise.”  When lightening darker areas in a digital image, one sometimes runs into noise, either color noise which looks likes flecks of red, green, and/or yellow in that area, or luma noise, which looks like flecks of black snow.  Noise is usually unacceptable in commercial work and for stock images.  The answer is to bracket and take images in which even shadow areas are light enough to have detail without the need to lighten them, and to blend them into the finished image, either with HDR or layering and masking in computer-editing software.  Conversely, blown-out areas of one image can be recovered from a darker bracketed image, and give detail to blown-out areas.

In summary, bracketing with available lighting or with hot lights is basically the same, and white balance should be checked and adjusted should the need arise.

-Gary Silverstein


Tags: bracket, bracketing, brackets, commercial photography, editing, exposure, exposures, hdr, hot lights, image, layer, layering, lights, photography, Photoshop, professional, software, We Shoot Photography, weshoot.com
Posted in How To, Learning, Tips | Comments Off on Bracketing With Hot Lights And Available Light . . .

Bracketing Different Exposures . . .

Saturday, December 15th, 2012

Let’s talk about the art of bracketing.  Bracketing is taking the same image at several  different exposures so you are sure to get the detail you desire in your images during digital post-production.  You may want to use high dynamic range (HDR) features in your computer software or camera to combine the exposures into one homogenous image, preserving both shadow and highlight detail from all the different exposures.  Or, if you prefer, you can use editing program masking techniques which allow the use of layers to achieve the same goal, but with more of a standard photographic look to your work.  HDR is sometimes difficult to work with to get an image that looks like what we have come to accept as “a photographic look,” and instead seems to have the feel of an illustration.

You can bracket manually, or some cameras will allow automatic bracketing in their menus.  My work cameras will allow 3, 5, 7, or 9 images to be taken automatically at a set rate of exposure variance, which I can specify (generally for me at 2/3 of a stop).  Using this method, I usually set the camera to alter the shutter speed from overexposed to underexposed.  I recommend shooting in aperture priority and altering the shutter speed as it keeps the aperture the same.  If you bracket by changing the aperture, sizes of things in the resulting images will be slightly larger or smaller in each exposure depending on the aperture dimension.  This will make it difficult to properly align each image.  I don’t recommend hand-holding the camera as it introduces camera shake and misalignment and, therefore, I usually use a tripod for bracketing.

In future posts, I will be touching more on bracketing and working with strobes, and hot lights, and how you can work on these in an editing program.

-Gary Silverstein
Tags: bracket, bracketing, camera, exposure, hdr, high dynamic range, layering, masking, multi-exposure, over expose, under expose
Posted in How To, Learning, Tips | Comments Off on Bracketing Different Exposures . . .

The Difference A Background Can Make . . .

Monday, October 1st, 2012

In the days of film, a professional commercial photographer had to be very careful of the backgrounds that would be used in his/her images.  Retouching was expensive.  Shooting an item for use against another background from the one it was taken with could be a labor-intensive multi-step process.  A spot on a high-key (pure white) background  could be touched out on the negative, and a nightmare undertaking on a transparency.   Today, of course, images are taken digitally and manipulated by editing programs, like Photoshop.  One of our most recent shoots involved large, heavy industrial products.   In film-days past, we would have probably used a seamless white background to shoot the product and spent a lot of time with product placement.  The items to be photographed were round, between two and three feet in diameter, and each weighed 500 or more pounds.  Five views were to be taken of each.  That means that either the item would have to be moved on the background, or very carefully lifted by a hoist onto the background.  We would have to be careful of marks left by the items where they rested on the paper, and some method of keeping such round items from rolling off the surface would have to be employed and kept out of sight.

So, pre-planning for the shoot is still important, even in this digital world.  We opted to not use any type of manufactured background per se, but to only use white reflectors in strategic places to reflect light or add a highlight where we desired.  Not using a background simplified the lighting somewhat in that a roll of paper or fabric didn’t block out the light from behind each item.  We were going to photograph the items in the factory environment with the idea that we would isolate the image in Photoshop, and put it on another, more desirable background.

Lighting was done with our powerful studio strobes, and the modeling lights on the strobes gave us an idea of how the lighting would look in the finished image.  We shot with soft-boxes to give a square look to our lighting in the highlights, as umbrellas just wouldn’t cut it here as these products were light-reflective.  We planned to keep the camera stationary, move the lights as necessary, and rotate the product for the five different angles the customer required.  Since the objects were circular,  and we wanted to keep all the images the same size, we had to plan how to keep that proportionality.  Think of a coin stood on edge.  The widest the image would have to be is a little more than the diameter when one of the faces of the coin is toward you.  When the edge of the coin is nearer to you, the size of the image could change, but we wanted to make them all the same size for the client’s ease of putting together several views of their product.  Also, we had to be far enough away to assure depth of field when we were shooting the views that showed part of the object furthest away.  Editing programs have great sharpening utilities, but a severely out-of-focus image cannot be brought back.  You can easily blur parts of a sharp image and make it look good if needed for the effect, but the reverse isn’t the case.  So all this had to be figured out in advance.

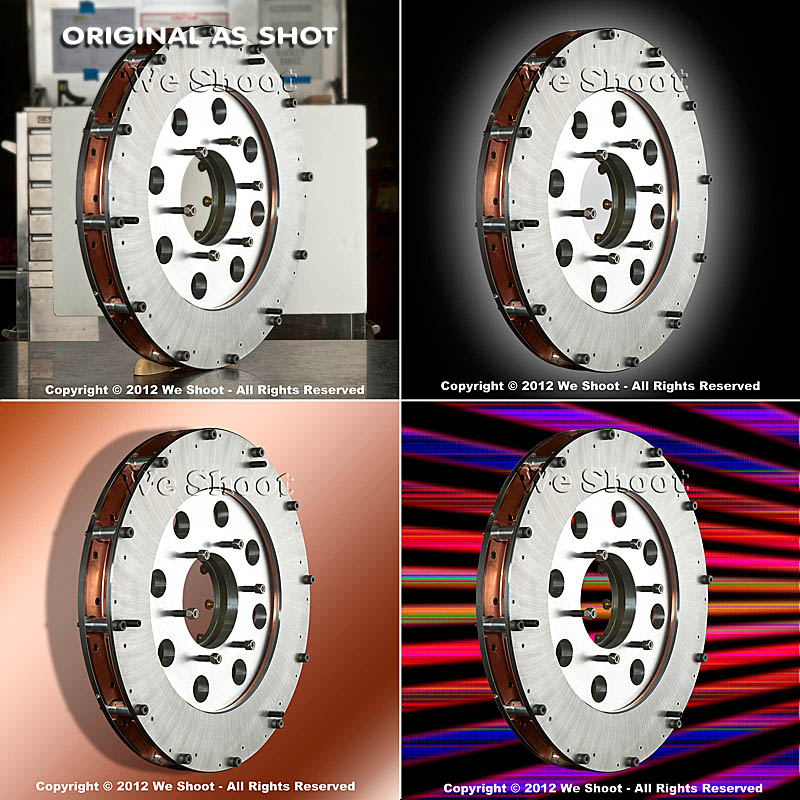
Now, let’s go on to the backgrounds for the images.  Since the area or table on which the items were shot was in a fixed location, the background for each image (as produced by the camera) would have been a toolbox and other parts of the assembly plant.  So we made it so that we and our client could “lift” the item off the background and put it on any other background or even a video.  This is done by means of a “clipping path.”  This is a very labor-intensive process.  It means that I use a Photoshop tool to painstakingly trace out every edge of the product at anywhere from a 100% to a 300% enlargement.  Once I have outlined every hole, edge, and cranny, I “select” the item alone and make a layer of it to put on other backgrounds.  I include this clipping path with the image, so the client is able to do the same.  Now, you may ask why I do so much work, as some of the editing programs have become pretty sophisticated and make an easier selection with other, faster tools.  Well, the answer is this:  I have used these editing tools, and sometimes there are errors in the program choosing what is part of the item and what is not.  It may not be noticeable on a small jpeg on a website, but it will stick out like a sore thumb on a 30X40 enlargement at a trade show.  That is what separates a pro from an amateur.  Below are an original view of one of the products, and a few different backgrounds that I feel work well.  Each background below was created in Photoshop, but other backgrounds could be used, as well.  Remember that whichever one a client chooses, I include the clipping path so they can put it against another background if that is their need.

As you can see, the product image looks at home with any of the backgrounds.  Keep this in mind as you plan your next shoot.

– Gary Silverstein

Tags: camera, commercial photographer, commercial photography, http://weshoot.com, Marketing, photographer, photography, Photoshop, professional, reflections, video
Posted in How To, Learning, Tips | Comments Off on The Difference A Background Can Make . . .

Video: Why a clapperboard should be part of your kit bag . . .

Tuesday, July 17th, 2012

Clapperboard


Did you ever watch an old Hollywood movie about making a movie?  At the beginning of each scene and take, someone holds up a slate with something like, “Scene 6, Take 164,” on it and audibly says the same thing that is on the slate.  At the top of the slate is the “Clapper,” and usually after the director yells “Action,” the person holding the slate claps it to denote the start of the scene.  Actually, the cameras are already rolling so they can record the slate, and the clap.  In the early days of movies, the slate was used to denote the scenes and takes so, when editing the film, the editor was able to piece together the scenes to make the story flow.  Scene 6 and Scene 3 may have been in one city, and other scenes in another.  As sound came in, the clapper was added to allow synchronization of sound to film.  Since the cameras were noisy beasts, the sound was recorded on a separate device, and the clapping sound was synchronized to the visual of the clapper sticks hitting one another.  They were then paired up, and the clapperboard visuals and sound were edited out in the final version.

Today you may ask why you would want to purchase and use this contraption since the audio and video are synchronized by the camera and in lockstep, unless intentionally unlinked in the video editing software.  The answer is that the slate is still needed for real video editing, and the clapper is very handy for synching multiple cameras and the sound with different angles of the same scene.  Almost everybody is bothered when the mouth movement doesn’t synch with the sound.

The truth is that anyone today can shoot a video!  All you need is $100 or more and a heartbeat.  Simple, cheap video cameras (or camcorders) are readily available.  But, professional video cameras can cost well above $60,000.  Why would anyone spend a lot of money for a camera when the images on our TVs looks pretty good from low-priced cameras?  A couple of  reasons are that the image degrades from the cheaper cameras when less than ideal lighting is encountered.  Video noise becomes a factor.  Also, sound input and output is better the more you spend on the camera.

Should you shoot your own video for your business?  Unless you are a budding amateur Spielberg, probably not!  While pushing the record button is easy, buying quality software like Adobe Premiere Pro and After Effects is expensive and learning how to use it can be daunting.

Using lighting can add quality to your video, and there is a whole science to it.

Do you have lights?  Do you have pro software to edit your video?  Are you proficient in video editing?  Do you have a camcorder of sufficient quality to overcome video and audio noise?  These are questions you should ask yourself before trying to promote your business in a video.

In making a video, my partner and I meet with our client to map out the story before even going near a camera.  Videos take planning.  Several days of shooting stills and video can go into a short promotional video.  Way more time is spent editing it.

Now, back to the clapperboard.  The clapperboard we employ (see image above) allows for a tremendous time savings when we’re editing video.

Below, take a look at one of the latest videos we did for a music composer.  You will notice that even though we recorded him from two different angles with two cameras, his mouth is in synch in the side view and the front view.  The guitar-playing scene was also shot with two cameras.  This two-camera setup is included at no extra charge.  It adds a dynamic not found in most amateur endeavors, and this professional look much more successfully illustrates the professionalism of your business.  Don’t put out a substandard video.  It could do more harm than good.

-Gary Silverstein

Tags: audio, clapper, clapperboard, http://weshoot.com, sound, two-camera, video, video production, videography, visual, we shoot, weshoot.com
Posted in How To, Learning, Tips | Comments Off on Video: Why a clapperboard should be part of your kit bag . . .

Video And Animation . . .

Sunday, March 18th, 2012

I think that video and animation is something that stills photographers have to become more aware of in order to be competitive.  One of the areas is simple animation of still photographs.  Fortunately, Photoshop CS5 has an application within it to take your still photo and make a short animated video that can keep on running on your web page to attract attention.  Older versions may have this capability also, but since I no longer have any of them available, I can only speak to what I have.  (See the image below to get an idea of what can be done.)  I have used the header image from our We Shoot Facebook page at http://on.fb.me/kH0Ozp to make a flashing “Eat at Joe’s” type of billboard for this purpose.  There are three transitions: First, just as a collage; second, “Call Now” is added; and, third, our phone number is flashed over our name.

I won’t go into how to make such an animation except to say that you go into the menu at the top of Photoshop and pick Window>Animation.  You can look up how to use this in the help menu, or go to Vimeo or Youtube to get step-by-step instructions on how to carry this out.  If you already have a knowledge of timelines in slideshows or video editing programs, you are already on your way.

BTW, the file size can be made relatively small, and take almost no time to load.  The animation will not work on some web pages, such as on Flickr, but will work elsewhere, and unless you have it blocked on your own website, it will probably work there.  As you can see, it works on this blog.

Have fun.

-Gary Silverstein

We Shoot

Tags: animation, fun, http://weshoot.com, photography, Seattle commercial and advertising photography, stills, video
Posted in How To, Marketing, Tips | Comments Off on Video And Animation . . .

Video from still photography . . .

Sunday, December 11th, 2011

Slide shows have been around for a long time. How can someone use a still photograph in a video and see it move? One method in digital slide shows is to “pan” a still image – that is, pan across an enlarged still image by starting at one side of a room, for example, and move your “camera” to the other side of the room as though you were scanning the room with your eyes from one side to another. Another way is to see an element in a photo and to “back away” so as to see the whole image. There are many slide show programs out there which will do this. One thing lacking in these images is depth. If I took a still image of a staircase and “panned” it, it would lack depth. If I took a video camera and panned the same staircase, it would look more real because there would be a perceived foreground (the balusters or stair sticks) and background (back wall), actually appearing to have movement between the foreground and background due to “camera” movement.

A still photograph can’t have that movement – or can it? See the video above, and pay attention to the hamburger plate in relation to the background. This image was a still photo taken during a food shoot for a local restaurant chain, and reworked in both Photoshop CS5.1 Extended and Adobe After Effects CS5.5. As you can see, the meal gets bigger while the background stays the same size, blurs, and appears to move slightly to the right. The plate looks like it is coming toward you and away from the background. This gives the illusion of depth and movement. I have seen this technique in some old sepia photos from bygone eras on TV where a famous Wild West character comes out of an old photo toward you and the “camera” “moves” to the right. This adds a dynamic to a still photo making the subject three-dimensional, and gives the photo a video presence.

-Gary Silverstein
We Shoot

Tags: cheeseburger, commercial and advertising food photography, depth, food, food photography, food video, hamburger, movement, photography, realism, still image
Posted in How To, Tips | Comments Off on Video from still photography . . .

How to take more professional images . . .

Tuesday, August 9th, 2011

We just finished a product shoot where the client first tried to take the pictures himself.  That did not give him the results he wanted for his business promotion.   He called a friend with “A really good camera,” and the results were, shall we say, less than stellar.   He called us and showed us the images his friend had taken.   While he indeed may have had a really good camera, his friend lacked the skills and equipment necessary to show the products in the absolute best light (pun intended).   For most product photography, it is all about the lighting and knowing how to use it.   It is not about the camera, lens, or resolution (sufficiency in each is all that is needed).   Quality of lighting – diffused or harsh, color of lighting, and its relationship to white balance are all factors.   Lighting shape is a factor – square, round, or some other shape.   How will the light reflect off the subject?    Using an umbrella to spread out the light when shooting a mirrored surface will show the ribbing in the umbrella in reflection.   Is a spotlight required?   How is that accomplished?   When should one use continuous lighting (such as hot lights), or should one use strobes?   What are the advantages of each?

When we were done and presented the final images to our client, he said that he felt bad that he wasn’t using his friend’s images.   But then he said this was about making money from his business and increasing same, and although he didn’t want to make his friend unhappy, he wanted to use these images to make money.   And that is the bottom line.   I am including some images as samples.   They have nothing to do with the above-mentioned product shoot, but are being used for illustrative purposes only.

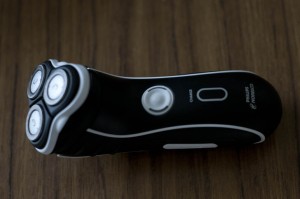
Sample 1 is an image I took to illustrate really poor photography.   I used the flash built into a pro-sumer DSLR and the image is badly out of focus (on purpose).   It is underexposed.   It is taken against a dark busy background, and there is no editing whatsoever of the image.   I have seen shots like this on eBay, and even company websites when someone is trying to promote their products – anything from a widget to a building.   Except for the fact that the image cost nothing to create (once the camera has been purchased), there is nothing good to say about it.   In fact, bad photography could be hiding flaws in the product, as far as the viewer knows.   If the photography is bad, whatever the company is selling is suspect – if corners are cut with the photos, what corners were cut with the product?   For a better chance at selling an item with a photograph, a bit of work will be involved.

poor amateur product image

Sample 1 - Click to Enlarge

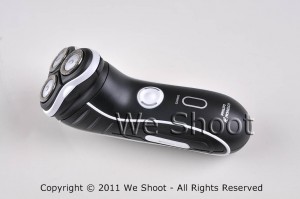
Sample 2 is against a white fomecore background and had two AC-powered studio strobes with soft boxes opposite each other at each end of the shaver to show texture in the shaver, and to highlight  stainless steel cutting heads.   The soft boxes spread light out with very diffused lighting and bring out a lot of detail with no harsh shadows.   There is some minor enhancement with Photoshop in this sample.

Basic well-lighted product image

Sample 2 - Click to Enlarge


In sample 3, I have made a “clipping path” to trace out the shaver from the original background, rotated the image vertically, and made a background layer with Photoshop in which I made a gradient of black and red.   Some more enhancement was done with Photoshop, including making the glowing yellow-green lights on either side of the on-off switch to simulate the look when the shaver is switched on.   Now you may ask why I didn’t take it with the shaver “on,” instead of simulating the look.   First, the shaver probably wouldn’t stay in position with the vibration of the shaver running, and also because I had more control of how it looks in the output this way.

weshoot.com product image

Sample 3 - Click to Enlarge

Now, which sample image would you choose to promote your product?

I will help you get close to sample 2 results, but you have to have some other props and accessories and do extra work to get there.  First get something white (for a dark subject) as a background , like a piece of fomecore.   It also helps reflect white light onto a dark object.   If shooting a light-colored or white object, you might want to go with gray or black as a background to contrast.   Next, go to a store like Lowe’s or Home Depot and buy several clamp light housings (see http://bit.ly/o3p5cP ) and a commensurate number of daylight compact fluorescent bulbs.   This won’t work as well as strobes with soft-boxes, but it will beat using a camera-mounted strobe.   Try different lighting positions until you get the lighting, shadows, and highlights you desire.   You will also need a tripod and a camera capable of taking a time exposure and allowing the flash to be deactivated.   You may also need to set the white balance (check your camera or editing program documentation to see how to do that ).   Make sure to get sharp focus.   Getting too close to the subject reduces depth-of-field, and some part of the subject will go out of focus.   Take several shots at different exposures to get the best one.   It may take more tries to get exactly what you want.

To get to sample 3 results, you will need a photo-editing program, and know enough on how to work with images for given results.   That is not within the scope of this article.  Really good product image editing takes knowledge, experience, and patience.   It can be time consuming and a lot of hard work.   It also helps to know a few enhancement secrets and have a lot of Photoshop experience.  That’s why I still get work, even if my client has a “really good camera.”

– Gary Silverstein

Tags: commercial product photography, product photographer, We Shoot Photography, weshoot.com
Posted in How To, Learning, Tips | Comments Off on How to take more professional images . . .

Take much better pictures with your camera: Move and soften that flash!

Thursday, July 28th, 2011

For a doctor, the first rule is, “Do No Harm.”  The first rule for better photography should be, “Take the flash unit off your camera (if possible)!” Why? Well, it is an unflattering lighting source, for one.  It is a bright direct light source like the sun.  It produces harsh shadows and high-contrast conditions for your subject.  You won’t see any of that in well-done professional commercial images, unless that is the specific intent .  Just look at beautiful models on magazine covers, or products in a name brand ad.  Remember when someone was telling ghost stories and held a flashlight under their face?  It threw the harsh shadows upward and gave the story-teller a scary look.  Normally, on-camera flashes throw harsh shadows downward on a horizontal image, and to the left or right on a vertical image. A lot of good wedding and portrait photographers use accessory flash units very similar to the one you might use on your camera, but they mount them off the camera.  A lot of these photographers are able to hand-hold their units by mounting the flash to a bracket which moves the flash way above and centered over the lens axis to allow the shadows to drop down behind the subject so they are not noticeable in the images.  When they want to take a vertical shot, the bracket allows the strobe to still stay positioned at center and over the lens axis so the shadows drop down behind the subject. This approach also reduces the chance for “red-eye,” (the glowing red marbles) as well. Another trick is bouncing the light off a diffuser card (attached to a number of modern flash units), or through specific attachments, or putting tissue paper or some other white translucent material over the strobe to mitigate the harsh shadows.

If you don’t want or can’t afford a flash bracket, some DSLR cameras allow wifi remote control of a dedicated flash so you can hold the flash above the camera, or most of these cameras have accessory wires available so you can hold the flash sufficiently above the lens to get the same effect.

A lot of people use point and shoot cameras.  They can’t remove the flash unit, but they can usually turn it off.  It will require the photographer to utilize a tripod or other support for the camera and shoot with available light.  Many of these cameras have different modes or manual controls to allow slower shutter speeds so ambient light can be used instead of that bright, unflattering strobe light.

Try these things, and your images will definitely start to look better.

-Gary Silverstein

Tags: flash photography, getting better pictures with flash, more professional look to my pictures, shooting with flash, weshoot.com
Posted in How To, Learning, Tips | Comments Off on Take much better pictures with your camera: Move and soften that flash!

There’s an app for that: QR codes

Tuesday, March 29th, 2011

* * * * * * * * * * * * * * *

A little while back I noticed that there were these little mottled squares popping up all over the place, and didn’t know what they were. Some digging on the ‘net turned up that most of them are called “QR” codes (for Quick Response). I found out that Smart Phones can download an app (application) that allows the phone to read different bar codes, including QR codes. But what is in a QR code, and why would anyone want to read it? I found that you can put information into a QR code, like an instant link to a website, where the smart phone owner can point the phone’s camera at the code, and get the website up on their phone. Other info can be put into a code, like a phone number, and when read by the phone, will ask if that phone number should be put in the contact list. But I also found that the more info you put into the code, the more complex and sometimes bigger the code becomes. Since I believe that smaller mobile devices will be the communications of choice with our clientele, I have instituted QR codes on our website. If captured from a PC, it will allow those on the go to put our site on their smart phones and they can browse our site while standing in line somewhere during their busy day. I also have a code with our phone number on it, should they decide to reach us that way. I plan to institute these codes on our business cards so that no one with a smart phone has to manually input any of our info. Just another rather efficient way to connect.

I found a free application to make QR codes at http://mobilecodes.nokia.com/scan.htm

– Gary Silverstein

Tags: code, communication, efficiency, efficient, qr, qr code, quick response, there's an app for that
Posted in How To, Marketing, Tips | Comments Off on There’s an app for that: QR codes

Time for a Cold One . . .

Tuesday, October 26th, 2010

Do you ever wonder about the frozen foods you purchase?  There is a whole industry working in the background to make sure your frozen food remains frozen while being stored and shipped.  An industrial engineering client of ours,
PermaCold Engineering, Inc., creates and installs machinery to keep the frozen storage industry frozen.  I’m not talking air conditioning here.  I’m not talking home freezer cold.  I’m talking keeping cold an area the size of a football field.  Serious refrigeration.  Fifteen degrees below zero Fahrenheit inside, ninety degrees above zero outside.  From hot to cold, all in the same facility.  Workers go in and out of this environment constantly.  As industrial photographers, we are tasked to brave all of these temperature variations, documenting the incredible machines and electrical and piping structures they build to make it all work.

 
If you want to shoot this kind of photography, be prepared to travel.  Since exterior shooting at one Oregon facility needed to start at 6 a.m., due to sun and building positioning (and not wanting to leave our home base at 3 a.m.), we opted to go to Oregon the day before to shoot exterior angles with sun on them late in the day while site-walking to get the “lay of the land.” 

In addition to being skilled in industrial photography, when shooting a cold-storage facility, architectural photography expertise is essential since shooting facility interiors and exteriors are a given.  In shooting architecture, unlike other forms of product photography, the product (building) and the lighting (sun) can’t be moved.  Exterior shots entail optimum positioning of the sun.  When shooting ultra-wide-angle lenses, lens flare may occur on the lens elements whether it’s a bright overcast sky or a direct sun.  Try retouching these flares in your editing program and plan on a bear of a time-consuming job. 

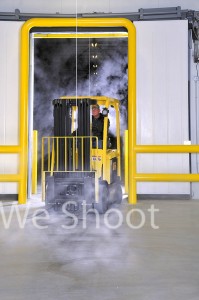
Day 2 of the Oregon facility shoot started at 6 a.m.  The shadows were still a bit long into the parking lot, but figuring we’d get our shadows out of our images with Photoshop, we began shooting one side of the building right away as there were no cars parked in front, giving us a clear shot.  After the doors were opened, we shot inside the loading dock, including the length of the dock and details such as glycol valving.  Next came the automatic sliding doors going into the main freezer and since our client wanted an image created with a forklift being driven out of the automatic doors, with condensation vapor around it, this came next.  Setting up a studio strobe in the freezer to backlight the lift and driver made for a beautiful shot.  See Image #1. 

Image #1

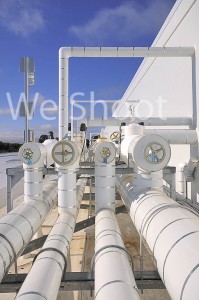
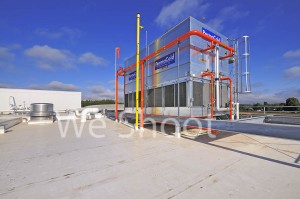
Next, on to the roof.  Up two flights of ladders.  Not ladders in the classic sense, but stairs with narrow steps where feet are placed sideways to make full contact.  Once up the stairs, a hatch in the ceiling brought us onto a roof with white rubberized coating to reduce heat from the sun, and piping of either shiny metal or a white outer pipe enclosure with insulation over the inner pipe.  See Image #2.  Due to considerable glare, the whiting out of image detail is a factor we needed to overcome.  (Think capturing detail while shooting white snow.) 

Image #2


With the temperature in the 90s, in and out of the piping we maneuver, taking a lot of roof images, including a refrigeration condenser as big as a small two-story metal house.  Housing multiple person-sized fan blades, this unit can make quite a loud roar.  See Image #3. 


Image #3

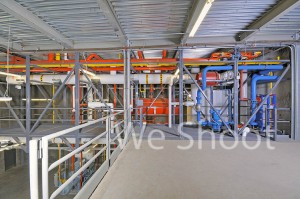
Down the ladders we go to the engine room, an important area to our client because of its unique two-level design.  The upper level has a catwalk with piping and other apparatus.  Not having enough light for good images, up the narrow stairs to the catwalk we strobes, strobe batteries (20 lbs. each), light stands and umbrellas in hand.  See Image #4.

Image #4

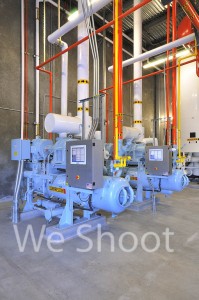
After shooting the upper level, we head down to the lower level to shoot several hours of pipes, pumps, and tanks, with the aforementioned lighting utilized for many of the images.  See Image #5. 

Image #5

After a short break with an apple and sandwich, it’s time for the freezer.  It waits for us with brutal cold.  We enter the chill with the wide-angle lens camera for the overall freezer.  The camera with a longer 18-200 mm zoom for a detail shot of an evaporator three stories above us will be retrieved later.  Each camera will last about 20 minutes before it freezes or its batteries weaken.  Figuring a face will not last much longer, on goes the ski masks.  No more frozen faces for these shooters.

We normally take nine different exposure levels of each view to get a good lighting spread, but, in this environment, time is of the essence so we limit it to five.  Using a higher ISO than we would use elsewhere to make higher shutter speeds possible, we take a number of shots from different vantage points. 

Now it is time to retire the wide-angle camera and get the longer lens camera.  The camera and lens go in a clean plastic turkey oven bag, the air is squeezed out, and the bag is sealed with a tie.  The bag and the camera are cold and dry, keeping condensation from forming on the camera and its guts.  We leave the freezer, put the camera in its bag, and take in the long-lens camera.  The tripod was left in the freezer so as not to get wet with condensation and quickly freeze when taken back in.  The tripod head has grease on its pivots and it freezes anyway so we slowly get it moving again.   It pays to remember that metal is brittle at this temperature and can shatter or crack if too much force is applied.  We take the rest of the images and prepare the long camera to leave this environment as we did the wide-angle camera.  The cameras are now useless to us for the rest of the day.  If taken out of the bags, they would get wet, the lens elements would frost over, and moisture would form between the elements, resulting in mold.  So the cameras and we are done for the day. 

An exciting day in the freezer no matter how many layers makes for numb bodies, but the wonderful memories, new friendships, and the great photography make one warm all over.   So bundled and warm down the long road we go.  The next stop is a quick rest and many days of editing great images for the eyes of our client.  And us?  We’re ready for the next cold one . . .

-Gary Silverstein 

Tags: ammonia cycle, cold, colder, coldest, commercial refrigeration, freeze, freezer, freezing, frozen, refrigeration
Posted in How To | Comments Off on Time for a Cold One . . .

<< Previous Next >>

  • Categories

    • How To (21)
    • Information (548)
    • Learning (30)
    • Lighting (179)
    • Marketing (291)
    • Photographs, Images (545)
    • Tips (38)
    • Uncategorized (2)
    • video (13)
  • Archives

    • September 2025
    • June 2025
    • May 2025
    • April 2025
    • January 2025
    • December 2024
    • November 2024
    • September 2024
    • August 2024
    • July 2024
    • June 2024
    • May 2024
    • April 2024
    • March 2024
    • February 2024
    • December 2023
    • November 2023
    • October 2023
    • September 2023
    • August 2023
    • July 2023
    • May 2023
    • February 2023
    • January 2023
    • October 2022
    • September 2022
    • August 2022
    • July 2022
    • March 2022
    • February 2022
    • January 2022
    • December 2021
    • July 2021
    • June 2021
    • May 2021
    • April 2021
    • March 2021
    • February 2021
    • January 2021
    • December 2020
    • November 2020
    • October 2020
    • September 2020
    • August 2020
    • July 2020
    • June 2020
    • May 2020
    • April 2020
    • March 2020
    • February 2020
    • January 2020
    • December 2019
    • November 2019
    • October 2019
    • September 2019
    • August 2019
    • July 2019
    • June 2019
    • May 2019
    • April 2019
    • March 2019
    • February 2019
    • January 2019
    • December 2018
    • November 2018
    • October 2018
    • September 2018
    • August 2018
    • July 2018
    • June 2018
    • May 2018
    • April 2018
    • March 2018
    • February 2018
    • January 2018
    • December 2017
    • November 2017
    • October 2017
    • September 2017
    • August 2017
    • July 2017
    • June 2017
    • May 2017
    • April 2017
    • March 2017
    • February 2017
    • January 2017
    • December 2016
    • November 2016
    • October 2016
    • September 2016
    • August 2016
    • July 2016
    • June 2016
    • May 2016
    • April 2016
    • March 2016
    • February 2016
    • January 2016
    • December 2015
    • November 2015
    • October 2015
    • September 2015
    • August 2015
    • July 2015
    • June 2015
    • May 2015
    • July 2014
    • June 2014
    • May 2014
    • September 2013
    • June 2013
    • March 2013
    • February 2013
    • January 2013
    • December 2012
    • October 2012
    • July 2012
    • June 2012
    • May 2012
    • March 2012
    • February 2012
    • December 2011
    • September 2011
    • August 2011
    • July 2011
    • March 2011
    • December 2010
    • October 2010
    • September 2010
    • July 2010
    • June 2010
  • Meta

    • Log in
    • Entries RSS
    • Comments RSS
    • WordPress.org

Copyright © 2025 - weshoot.com | Entries (RSS) | Comments (RSS)

WordPress theme designed by web design